Sunday, 6 January 2008

Playing with WPF

I wanted to explore some of the features of WPF today, so decided to knock up a simple example that would provide a contemporary (AKA: crap looking as it's designed by a developer!) user interface to a fictitious application

I wanted the layout to be skinnable and be able to change various aspects and colours of the application by adding extra XAML. Here's a screenshot of how the basic UI functions;

image image

The left image shows how the UI should look by default (albeit with a distinct lack of controls), whilst the image on the right shows the "reports" panel overlaid on top of the default UI. The overlays fade in and out as they are brought up and closed.

Pretty basic right? Well yeah, but it was a good exercise in learning some of the cool features of WPF. Lets start with the basic layout for the application. The following XAML is for the main window and it's panels.

   1: <DockPanel>
   2:     <!-- Header Area - branding -->
   3:     <Border Height="50" DockPanel.Dock="Top" 
   4:             BorderBrush="{DynamicResource BrandingLow}" 
   5:             BorderThickness="0,0,0,1" Padding="10,0,10,0" >
   6:             <TextBlock Opacity="1" FontFamily="Segoe" FontSize="24" 
   7:                        FontStretch="Normal" FontWeight="Light" TextWrapping="Wrap" 
   8:                        Foreground="{DynamicResource BrandingHi}" 
   9:                        VerticalAlignment="Bottom" Margin="0,0,0,5">
  10:                 <Run Foreground="{DynamicResource BrandingLow}">DC</Run><Run FontWeight="Normal">.Finances</Run>
  11:             </TextBlock>
  12:     </Border>
  13:     
  14:     <!-- Menu Area -->
  15:     <Menu DockPanel.Dock="Top" Margin="5,0,0,0" Style="{DynamicResource MenuStyle}">
  16:         <MenuItem Header="_Reports" x:Name="ReportsMenu" Style="{DynamicResource MenuItemStyle}" Click="ReportsMenu_Click" />
  17:         <MenuItem Header="_Admin" x:Name="AdminMenu" Style="{DynamicResource MenuItemStyle}" Click="AdminMenu_Click"/>
  18:     </Menu>
  19:  
  20:     <!-- Content Area -->
  21:     <Grid>
  22:         <!-- Main content - the account register -->
  23:         <local:RegisterPanel x:Name="pnlContent"/>
  24:  
  25:         <!-- Reports Pane - hides and shows as necessary -->
  26:         <local:ReportsPanel x:Name="pnlReports" Visibility="Hidden" PanelClosed="PanelClosed"/>
  27:  
  28:         <!-- Administration Pane - hides and shows as necessary -->
  29:         <local:AdminPanel x:Name="pnlAdministration" Visibility="Hidden" PanelClosed="PanelClosed"/>
  30:     </Grid>
  31: </DockPanel>

As you can see, we basically split the form into 3 sections. The branding area at the top, the menu area and finally the content area which hosts 3 separate user controls, 2 of which are set to be hidden (the admin and reports panels).

Skinning using resources and styles

Notice that in order to allow the application to be "skinned" and have it's colours changed etc, we have made use of {DynamicResource} in a number of places for brushes and for styles. These are then encapsulated into a separate XAML file. For example, the XAML for the BrandingLow resource is as follows;

<SolidColorBrush x:Key="BrandingLow" Color="#FFCFD3DA"/>

This defines the branding low light brush, and can then be referenced as {DynamicResource BrandlingLow} anywhere in XAML that requires a brush. But to get the resource linked to the application, we must add it to the applications resource dictionary. This is done in app.xaml as follows;

   1: <Application x:Class="DC.Finances.App"
   2:     xmlns="http://schemas.microsoft.com/winfx/2006/xaml/presentation"
   3:     xmlns:x="http://schemas.microsoft.com/winfx/2006/xaml"
   4:     StartupUri="MainWindow.xaml">
   5:  
   6:     <Application.Resources>
   7:         
   8:         <!-- Pull in the merged resources - use default skin -->
   9:         <ResourceDictionary>
  10:             <ResourceDictionary.MergedDictionaries>
  11:                 <ResourceDictionary Source="Skins\Default\Skin.xaml"/>
  12:             </ResourceDictionary.MergedDictionaries>
  13:         </ResourceDictionary>
  14:  
  15:     </Application.Resources>
  16: </Application>

This embeds the skin.xaml file as a resource. Within this XAML we can either go ahead and define the elements we need or we can split it down into separate files. In this case I chose to split it into additional files to separate the brushes and styles etc.

Styles are interesting in WPF. They allow you to define a common look and feel for different element types and also add behaviour. Take for example, the style used for a menu item as seen in the example above;

   1: <MenuItem Header="_Reports" x:Name="ReportsMenu" 
   2:     Style="{DynamicResource MenuItemStyle}" Click="ReportsMenu_Click" />
   3:  
   4: <MenuItem Header="_Admin" x:Name="AdminMenu" 
   5:     Style="{DynamicResource MenuItemStyle}" Click="AdminMenu_Click"/>

The MenuItemStyle is then defined as;

   1: <Style x:Key="MenuItemStyle" TargetType="{x:Type MenuItem}">
   2:     <Setter Property="Background" Value="Transparent"/>
   3:     <Setter Property="Foreground" Value="{DynamicResource FontColor}"/>
   4:     <Setter Property="FontSize" Value="10"/>
   5:     <Setter Property="Padding" Value="8,5,20,5"/>
   6:     <Style.Triggers>
   7:         <Trigger Property="IsHighlighted" Value="true">
   8:             <Setter Property="Background" 
   9:                 Value="{DynamicResource MenuActiveBackgroundBrush}"/>
  10:             <Setter Property="Foreground" 
  11:                 Value="{DynamicResource MenuActiveFontColor}"/>
  12:             <Setter Property="BorderBrush" Value="#FF000000"/>
  13:         </Trigger>
  14:     </Style.Triggers>
  15: </Style>

This defines a style named MenuItemStyle that applies to elements of type MenuItem. It sets the background colour to transparent, the foreground colour to the standard font colour from the resources, the font to use 10 pixels and to use a specific padding. In addition it then defines some rudimentary behaviour in the form of triggers.

When the IsHighlighted property of the host item (a MenuItem element) is set to true, the three setters that are specified within the trigger are invoked. In this case it changes the background colour, foreground colour and outline brush to be of specific colours. This provides us with a nice rollover effect on the menus that use this style;

image image

Applying animations

As mentioned above, when we click reports or admin on the menu, we want to bring up the appropriate panel, and play a little animation to fade it in, then fade it out when we close it. This is incredibly easy in WPF.

Here's the Window.Resources section from the main form, which defines two storyboard based animations for fading up and down elements;

   1: <Window.Resources>
   2:         <!-- Animation for showing panels -->
   3:         <Storyboard x:Key="ShowPanel">
   4:             <DoubleAnimationUsingKeyFrames BeginTime="00:00:00" Storyboard.TargetProperty="(UIElement.Opacity)">
   5:                 <SplineDoubleKeyFrame KeyTime="00:00:00" Value="0"/>
   6:                 <SplineDoubleKeyFrame KeyTime="00:00:00.3000000" Value="1"/>
   7:             </DoubleAnimationUsingKeyFrames>
   8:             <ObjectAnimationUsingKeyFrames BeginTime="00:00:00" Storyboard.TargetProperty="(UIElement.Visibility)">
   9:                 <DiscreteObjectKeyFrame KeyTime="00:00:00" Value="{x:Static Visibility.Visible}"/>
  10:                 <DiscreteObjectKeyFrame KeyTime="00:00:00.3000000" Value="{x:Static Visibility.Visible}"/>
  11:             </ObjectAnimationUsingKeyFrames>
  12:         </Storyboard>
  13:         
  14:         <!-- Animation for hiding panels -->
  15:         <Storyboard x:Key="HidePanel">
  16:             <DoubleAnimationUsingKeyFrames BeginTime="00:00:00" Storyboard.TargetProperty="(UIElement.Opacity)">
  17:                 <SplineDoubleKeyFrame KeyTime="00:00:00" Value="1"/>
  18:                 <SplineDoubleKeyFrame KeyTime="00:00:00.3000000" Value="0"/>
  19:             </DoubleAnimationUsingKeyFrames>
  20:             <ObjectAnimationUsingKeyFrames BeginTime="00:00:00" Storyboard.TargetProperty="(UIElement.Visibility)">
  21:                 <DiscreteObjectKeyFrame KeyTime="00:00:00" Value="{x:Static Visibility.Visible}"/>
  22:                 <DiscreteObjectKeyFrame KeyTime="00:00:00.3000000" Value="{x:Static Visibility.Hidden}"/>
  23:             </ObjectAnimationUsingKeyFrames>
  24:         </Storyboard>
  25:     </Window.Resources>

Lines 3 - 12 show the animation declaration for fading up an object. The storyboard follows two animation paths, one on the opacity of the target object and one on the visibility property of the target object. For fading up, we see a spline keyframe animation moving the value of opacity from 0 to 1 over the course of 1/3 of a second. This then fades smoothly between the values over the time period specified. Also, we use a discrete keyframe animation to set the visibility property to true when the animation starts.

Lines 15-23 do the exact same thing but in reverse, and the discrete keyframe animation on the visibility property sets the object to hidden at the end.

Simple huh? So the only thing left to do is to trigger the animation when the menu item is clicked and bring the appropriate panel up.

The possible options here are;

a) User clicks the reports or admin menu

a1) No current panel - just fade up the selected panel

a2) Current panel visible - fade it down, then fade up the selected panel

b) User clicks the close button on a panel

b1) Fade down the active panel

To implement this logic, I chose to use the code behind to track an active FrameworkElement, then when I click on a menu option, I invoke the fade animation on the active element, fade up the new element and make it the active one.

Triggering animations is as straight forward as;

((Storyboard)this.Resources["HidePanel"]).Begin(_activeChildComponent);

As such, the entire logic for showing/hiding panels etc is shown below;

   1: public partial class Window1 : Window
   2: {
   3:     // This will be used to track any active open panels
   4:     FrameworkElement _activeChildComponent = null;
   5:     
   6:      /// <summary>
   7:     /// User clicked reports menu, hide the current panel if there is one and show the reports pane
   8:     /// </summary>
   9:     /// <param name="sender"></param>
  10:     /// <param name="e"></param>
  11:     private void ReportsMenu_Click(object sender, RoutedEventArgs e)
  12:     {
  13:         HideActivePanel();
  14:         ShowPanel(pnlReports);
  15:     }
  16:  
  17:     /// <summary>
  18:     /// User clicked admin menu, hide the current panel if there is one and show the reports pane
  19:     /// </summary>
  20:     /// <param name="sender"></param>
  21:     /// <param name="e"></param>
  22:     private void AdminMenu_Click(object sender, RoutedEventArgs e)
  23:     {
  24:         HideActivePanel();
  25:         ShowPanel(pnlAdministration);
  26:     }
  27:     
  28:     /// <summary>
  29:     /// User clicked to close the panel
  30:     /// </summary>
  31:     /// <param name="sender"></param>
  32:     /// <param name="e"></param>
  33:     private void PanelClosed(object sender, EventArgs e)
  34:     {
  35:         HideActivePanel();
  36:     }
  37:  
  38:     /// <summary>
  39:     /// If an active panel is open, this will fade it down
  40:     /// </summary>
  41:     private void HideActivePanel()
  42:     {
  43:         if (_activeChildComponent == null) return;
  44:         ((Storyboard)this.Resources["HidePanel"]).Begin(_activeChildComponent);
  45:         // TODO: Need to find a mechanism to wait until the fade has completed
  46:         _activeChildComponent = null;
  47:     }
  48:  
  49:     /// <summary>
  50:     /// Sets the panel specified to be the active panel
  51:     /// </summary>
  52:     /// <param name="target"></param>
  53:     private void ShowPanel(FrameworkElement target)
  54:     {
  55:         ((Storyboard)this.Resources["ShowPanel"]).Begin(target);
  56:         _activeChildComponent = target;
  57:     }
  58: }

Have you spotted the deliberate mistake? I've not yet worked out how to wait for the animation to complete, so when you go from panel to panel, the current panel doesn't get chance to fade down properly before the new panel fades up... I'll save that for another day though.

LINQ to SQL - 5 minute introduction.

Whilst perhaps not a fully fledged OR/M solution like NHibernate, LINQ to SQL has a place in this world as it's an excellent tool if your domain entities map 1:1 to your database schema as it provides a visual tool (not always useful, depends on scale) to design your model along and it uses the excellent LINQ query syntax to get data out of the database.

I started this example by creating a separate project for the data access layer. This project is a standard class library, from which I've exposed the entities in our database along with repository objects that will be responsible for managing these entities.

image After creating a new class library for our DAL project, I've then added a couple of enum files that correspond to the different types of static data that I'll be needing and then added a LINQ to SQL Classes item.

image

This creates a DBML file and presents us with a designer surface to start dropping our tables and views from our database onto. A connection to the database needs to be defined in server explorer first, but once that is in place, and with the designer surface and server explorer open, you can now start to drag and drop the database elements onto the LINQ to SQL surface, thereby building up your entity model.

image

Notice how the designer automatically walks foreign keys and constraints and this in turn then automatically creates properties in your elements. For example, the Category entity in this example has a property named CategoryBudgets automatically created that will load the budgets associated with a category on demand (lazy load).

With your DBML file in place, and after following the post on how to use enums with LINQ from my earlier post, you should have a full object model of entities that can be queried using LINQ in your code;

For example, in your application you would be able to get a list of all categories by querying thus;

   1: DC.Finances.Database.FinanceDataContext dc = 
   2:     new DC.Finances.Database.FinanceDataContext();
   3:  
   4: var cats = from c in dc.Categories select c;
   5: MessageBox.Show(cats.Count().ToString());

However, we wouldn't want to put this LINQ code directly into our UI code as, sticking to the tenets of good design, specifically separation of concerns, we're going to keep that sort of thing in the DAL, so we would wrap this up with a repository class to go ahead and give us data we require, whilst implementing any rules and logic for us. eg: CategoryManager.GetAllCategories()

Saturday, 5 January 2008

Configuring SubVersion under Windows.

Whilst I'm an advocate of TFS as a dev process management and version control system, I also like subversion - it's a great, free, source control system with a vibrant community of users and a host of supporting tools. The following post is a quick and handy reference to getting SVN to run over the network.

First steps
First of all get hold of the latest subversion and tortoiseSVN and install them. Once that's complete, create a repository using the tortoiseSVN tools.

Setting up the network
To get it working, you can initially run the SVN server from the command line. Use something like this;

svnserve -d --listen-port 44818 -r e:\myRepository

-d puts the server into daemon (listening) mode
--listen-port parameter and argument is optional and specifies what port to listen on
-r then specifies the repository you've just created above.

With that working, you'll now want to run this as a windows service. In comes the ubiquitous sc.exe (part of your windows O/S)

Installing as a service
Run the SC tool to add scnserve as a service;

sc create "SVNServe" binpath="c:\SubVersion\bin\svnserve.exe --service -r e:\myRepository" displayname="Subversion Repository" depend=Tcpip

From there you can then set your service to start automatically and start the service.

Adding security
Its all well and good having SVN running, but a little security wouldn't go amiss! The files you need to edit are all contained in the conf sub-directory within your repository directory. 3 files - svnserve.conf, authz and passwd. Quick overview below;

svnserve.conf
[general]
anon-access = none
# auth-access = write
password-db = passwd
authz-db = authz
realm = My SVN server

This disables anonymous access to the svn server and forces the passwd and authz files to be used to configure the users and path based security permissions. The realm parameter will be presented to users when the SVN client asks them to login.

authz
#Define some groups of users
[groups]
groupX=user1,user2
groupY=user2


#Set the root of the repository to read
#only by any authenticated user
[/]
* = r

#Set a location in the tree to not available
#
to users initially, read/write for groupY users,
#read only for groupX users and specifically grant
#user1 read/write access.
[/someproject/path]
* = 
@groupY = rw
@groupX = r
user1 = rw

# Give all authenticated user read/write access
[/someotherproject]
* = rw

And last, but not least, the passwd file in this instance is where all the usernames and passwords are held.

passwd
[users]
user1=mypassword
user2=anotherpassword

Monday, 31 December 2007

Using enums in LINQ to SQL

A common practice when working with databases is to use enumerations for any static lookup (ID/description) data. These enums are represented both in code and also in the database for referential integrity. The idea being this static data rarely changes so we don't need to pull it back continually from the database.

Taking the following data model as an example;

Click for more details

All of the tables that end with Enum are static tables that consist of reference data only and we don't want this to be pulled back from the database. Instead these enum tables are represented in code as enums and as such we need to tell LINQ to map the fields that refer them to enum values rather than the database tables.

First things first, I mapped out my basic entities as follows (notice the lack of enum tables as objects in this model).

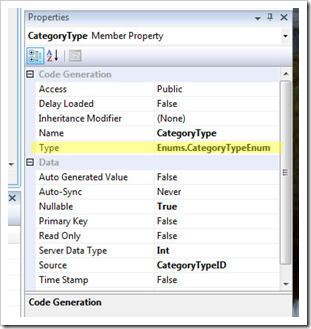
image In order to force the entities to use an enum value instead of loading a child entity object, I simply set the Type property for the field to a type in my project, as per the image below; (Also I renamed the fields from FieldXYZID to just FieldXYZ).

image

Finally, notice that because my enum definition is within the same assembly as my DBML, the type namespace is relative to the DBML. If it was in a different assembly, then you'd specify a full type name here instead.

Wednesday, 19 September 2007

Fixing the ClickOnce Error - "can't download files"

If after creating a click once deployment, you put it on your web server but find that when you run the .application URL, you get a "can't download files" error instead of your application running, check the details. If you're getting 404 errors for the .manifest or .deploy files, chances are IIS isn't configured correctly to support these file types.

By default IIS doesn't know what .manifest or .deploy files are, so it doesn't serve them out. You need to add them as MIME types by going into IIS manager, right clicking on the server name and selecting properties. Click MIME types and add the following;

.deploy      application/octet-stream

.manifest   application/manifest

Tuesday, 31 July 2007

Database diagram support objects cannot be installed...

Twice is two weeks SQL 2005 has reported the following error when I've clicked on the database diagrams node on certain databases;

"Database diagram support objects cannot be installed because this database does not have a valid owner".

The databases in question were restored onto my local SQL from backups on other machines and servers. I'd restore the database, set the owner using ALTER AUTHORIZATION, and then try to create a database diagram, only to be presented with the above error.

The symptoms actually mask the underlying problem - the database's compatibility mode. On both occasions the compatibility level was set to SQL 2000 (80) for the restored databases and it should be set to SQL 2005 (90). To resolve;

  • Open the properties for the affected database
  • Go to the options section
  • Change the compatibility level to SQL 2005 (90)

Friday, 13 July 2007

Introducing LINQ (to objects) in 10 seconds

The database uses of LINQ (to SQL/to Entities) get all of the glory, but LINQ can be used against your run of the mill objects in .NET. Take for example sorting strings;

1
2
3
4
5
6
7
8
9
10
11
12
13
14
15
16
17
static void Main(string[] args)
{
  string[] friends = new string[]{
    "Tony Johnson",
    "Joe Mangel",
    "Helen Daniels",
    "Sky Mangel",
    "Stingray",
    "Dylan Timmins",
    "Gerard Rebbeci",
    "Pippa Styger"};

  IEnumerable<string> sorted = from friend in friends
          orderby friend select friend;

  foreach (string person in sorted)
    Console.WriteLine(person);
}

The interesting part is on lines 13/14 - we get a list of sorted strings by executing SQL like syntax on our string array. Lets try something else, lets sort the list based on who's got the longest name, sorting from longest to shortest: Notice I'm also using anonymous types in the following example( var ).

1
2
3
4
5
6
7
8
9
10
11
12
13
14
15
16
17
18
19
static void Main(string[] args)
{
  var friends = new string[]{
    "Tony Johnson",
    "Joe Mangel",
    "Helen Daniels",
    "Sky Mangel",
    "Stingray",
    "Dylan Timmins",
    "Gerard Rebbeci",
    "Pippa Styger"};


  var sorted = from friend in friends
         orderby friend.Length descending
         select friend;

  foreach (var person in sorted)
    System.Console.WriteLine(person);
}

Easy, but very useful. You can use LINQ to sort collections of objects and do all sorts of powerful and useful things.

Thursday, 7 June 2007

App Domains and Dynamic Loading

Eric Gunnerson has posted an interesting and useful article on dynamic assembly loading and unloading using appdomains.

http://blogs.msdn.com/ericgu/archive/2007/06/05/app-domains-and-dynamic-loading-the-lost-columns.aspx

Monday, 4 June 2007

SQL Server - Changing collation order for an entire cluster

An annoying situation arose today with a project - development machines were using legacy SQL collation orders whilst the production cluster was using a windows collation. As all servers and databases should really use the same collation order, cross database joins and tempdb actions will cause you problems if not , it was decided that we'd change the production cluster to use the SQL_ collation orders!

What should have been a straight forward process actually turned out to be more difficult than expected and I found the following information useful, and largely undocumented;

The process for changing the collation order on a SQL server cluster is as follows;

  1. Backup all of your databases and then detach them all
  2. Take the SQL services offline in cluster management
  3. Slap your SQL install disk into a drive and run the following command from it:

    start /wait setup.exe
    /qn VS=<cluster name>
    INSTANCENAME=<sql instance name or MSSQLSERVER for default>
    REINSTALL=SQL_Engine
    REBUILDDATABASE=1
    SAPWD=<new strong SA password>
    SQLCollation=<new collation order>
    AdminPassword=<strong password>
    SQLAccount=<domain\account>
    SQLPassword=<strong password>
    AGTAccount=<domain\account>
    AGTPassword=<domain\account>

  4. Bring SQL online in cluster management
  5. Restore / re-attach your databases

Your master database etc will have been rebuilt and everything should be fine.

The problem I ran into however was when I used a different location to run setup from than was used in the original installation. Setup kept failing saying that it couldn't find valid setup package for "SQL Standard Edition (64 bit)". After trying lots of different combinations of the above, I discovered that despite running setup.exe from a new location, it actually looks at the registry to discover where it was installed from originally and wants to get the MSI files from there!!

The solution? You could change the registry to point to your new location, but easier is this extra parameter on your command line:

REINSTALLMODE=vomus

This tells the setup not to bother looking at the old location, and use the location where the setup is residing. This 60 minute job ended up taking almost 3 hours in the end - but at least I'll know for next time!