Today I decided to start a new site for a friend of mine, and being the owner of the FLUX.NET open source CMS, I obviously decided to use that. I figured I'd use this opportunity though to document a step by step guide to how to get flux.net setup from download to a single basic page being up and running, so here goes.
Step 1 - get the distro!
Go to http://flux.codeplex.com and get the latest release package (v2.0 release here)
Step 2 - Copy the files into your site
1. From the distribution, copy the /Src/flux_client folder into the folder that will be the root of your site

2. Next go into /Src/Deepcode.Flux.Admin/and copy the entire contents into a /admin directory in your site

3. Move the bin directory from admin, 1 level down, outside of the admin directory.
4. Finally, copy one of the web.config files from the distribution into your site. These are in the root of the distribution and are named FormsWeb.Config and WindowsWeb.Config. In this instance, I want to use forms authentication so I'll take FormsWeb.Config, copy it into my site and rename it to web.config.
5. At this point, you should have a site directory structure as follows;

Step 3 - configuring IIS and SQL for local development
1. Open IIS manager, right click on the default website and select to create a new application (I'm using IIS7 in this exercise):
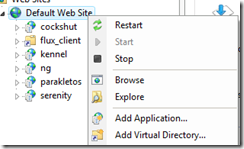
2. Give the virtual directory an alias to use, set it's application pool to classic .NET app pool and point the physical path to the directory you've created in step 2.4 above.

3. Open SQL Server and create a database for your content. (You can get the installer tool to create it for you, but I prefer to create it by hand)...
Step 4 - install the application
1. Navigate to http://localhost/youralias/admin/setup/install to start the installation process and click next to open the setup database form:

2. Enter the parameters necessary to connect to the database you created earlier. For my local development environment, I setup my server as ".", fluxtest as the database name, ticked the database has already been created checkbox, and specified windows authentication as the SQL authentication mechanism. Click next to go to authentication setup.
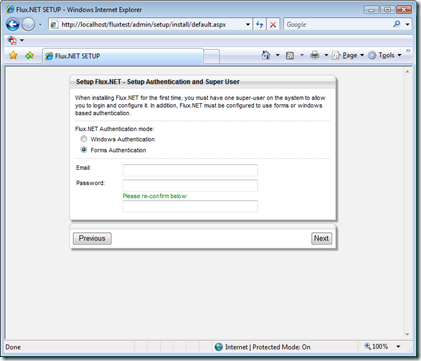
3. As we're aiming for forms authentication here, I selected "Forms authentication" and setup the details of my super user to correspond to myself. Click next to go to general setup;

4. Enter a name for the installation (which will appear in the administration tools), along with a default mail server and an address which flux can send email as. Click next to review your installation settings.

5. Click finish to begin installation. At this point the system will install the database scripts and generate configuration files. As such, the app pool users of your web application must have write access to the location of your site and the SQL user/windows user also must have permission to create tables and stored procedures etc in your database. Once complete, you should see a screen like that below and a flux.config file will appear in a new folder called settings in your application.

6. If you "click here to continue" flux is now completely setup and you should be able to access the admin tool and it's modules etc as below;
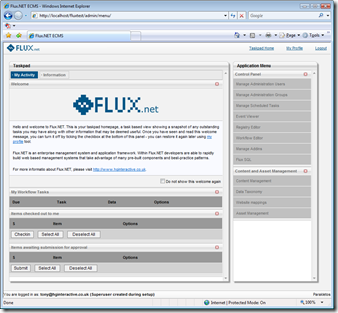
However, the application itself doesn't know anything about content at this point.... we need to configure it to make it do something next.
Step 5 - opening your site in visual studio.
In order to do anything useful we will need to open visual studio 2008 and open the web site. Open it directly from the local IIS installation. If it offers to update it to .NET 3.5, say yes so that we can utilise LINQ and other cool features in our rendering templates. With this done, you should now have an environment ready to roll;

Step 6 - the worlds most basic content type
Back in flux, If you open "content management" and select to add a new item of content, you will notice that it doesn't give you any options of what to add. That is because flux is completely agnostic of what data makes up content. It understands content concepts and how content should relate etc, but not necessarily what fields make up what types of content, for this we must give it some more information.
For the purposes of this demonstration we're going to build a CMS that can host multiple web sites, but only has basic HTML pages available to it. This keeps the scope simple so that I can actually complete this blog post in one sitting!!!!
1. In VS.NET Create a new folder under /settings called "types" and a folder within this called "Site".
2. Add a new XML file to this folder and name it "Site.type.config". Then paste the content below into it;
<NodeType ID="Site" Name="Website" LimitVersions="1">

    <AddForm>~/settings/types/Site/form.aspx</AddForm>
    <EditForm>~/settings/types/Site/form.aspx</EditForm>

    <Relationships AddRoot="true">
        <Add>Page</Add>
    </Relationships>

    <StaticData>
        <Template>~/settings/types/Site/render.aspx</Template>
    </StaticData>

</NodeType>
This defines a content type that we can add to our system. LimitVersions="1" tells flux only to keep a maximum of 1 version history of anything that is of this type. The Add/Edit form specifies the ASPX templates that will be used to add or edit content items of this type, which we'll build shortly. The relationships section determines how this content type relates to other items. In this case, we tell flux that sites can be added to the root node and within them, a content type called page can be added. Finally the static data template item specifies the rendering template when content of this type is rendered in html.
3. Now we need to create the ASPX file that will let us add and edit content in flux. Create a new web form called form.aspx in the /settings/types/Site directory and set it's content as follows;
<%@ Page Language="C#" Inherits="Deepcode.Flux.Core.UI.CMS.CMSContentForm" ValidateRequest="false"%>
<%@ Register TagPrefix="flux" Namespace="Deepcode.Flux.Core.UI.Controls" Assembly="Deepcode.Flux.Core"%>
<script runat="server">
// Type ID being managed by this form
protected override string FormTypeCode { get { return "Site"; } }
// Do form setup
protected override void SetupForm(int ContentID, int ParentID)
{
if (!Page.IsPostBack)
{
fChannelPath.NodeIDParent = ParentID;
fChannelPath.NodeIDPathed = ContentID;
}
}
// Save fields to content object
protected override void SaveContent(ref Deepcode.Flux.Core.Systems.CMS.ContentObject save)
{
save.NodeName = this.fChannelPath.Text;
save.NodeTitle = this.fChannelName.Text;
}
// Load fields from content object
protected override void LoadContent(Deepcode.Flux.Core.Systems.CMS.ContentObject load)
{
this.fChannelName.Text = load.NodeTitle;
this.fChannelPath.Text = load.NodeName;
}
</script>
<html>
<head id="Head1" runat="server">
<link href="../../../admin/Asset/Style/GeneralStyle.css" rel="Stylesheet" type="text/css" />
</head>
<body class="nopadshaded">
<form id="form1" runat="server">
<flux:HostTable ID="HostTable1" runat="server">
<%-- Summary --%>
<flux:ValidationSummarySection ID="ValidationSummarySection1" runat="server" HeaderText="Please correct the following errors"/>
<%-- Form area --%>
<flux:Section ID="Section1" runat="server" Title="Add/Edit Website channel">
<flux:ShadePadBox ID="ShadePadBox1" runat="server">
<table cellspacing="0" cellpadding="3" border="0">
<tr><td>Channel Name:</td>
<td><asp:TextBox runat="server" ID="fChannelName" Width="300px" MaxLength="500"/></td>
</tr>
<tr><td>Channel Path:</td>
<td><flux:NodePath runat="server" ID="fChannelPath" Width="200px" MaxLength="100"/></td>
</tr>
</table>
</flux:ShadePadBox>
</flux:Section>
<%-- Buttons --%>
<flux:Section ID="Section2" runat="server">
<flux:PadBox ID="PadBox1" CssClass="Pad5Button" runat="server">
<asp:Button runat="server" ID="btnSave" Text="Save" OnClick="btnSave_Click" CssClass="button"/>
<asp:Button runat="server" ID="btnCancel" Text="Cancel" OnClick="btnCancel_Click" CausesValidation="False"/>
</flux:PadBox>
</flux:Section>
<%-- Validators --%>
<asp:RequiredFieldValidator ID="RequiredFieldValidator1" Runat="server" ControlToValidate="fChannelName"
ErrorMessage="You must specify the title of this channel" Display="None"/>
<asp:RequiredFieldValidator ID="RequiredFieldValidator2" runat="server" ControlToValidate="fChannelPath"
ErrorMessage="You must specify the path of this channel" Display="None"/>
</flux:HostTable>
</form>
</body>
</html>
There are a large number of flux specific controls in there, but it should be reasonably self explanatory. The base class CMSContentForm within flux provides everything necessary to wire our form up. It invokes Save/Load content methods and utilises the form type code to determine what it's editing. All we do is override these methods and add the fields in/out of the persistence mechanism.
4. We need to go ahead and create a Page content type now also, so we can publish something so add another folder within types called Page along with the configuration file "Page.type.config" and it's editor form "form.aspx", using the following content:
/Settings/types/page/Page.type.config
<NodeType ID="Page" Name="Web Page" LimitVersions="1">

    <AddForm>~/settings/types/Page/form.aspx</AddForm>
    <EditForm>~/settings/types/Page/form.aspx</EditForm>

    <Relationships AddRoot="false">
        <Add>Page</Add>
    </Relationships>

    <StaticData>
        <Template>~/settings/types/Page/render.aspx</Template>
    </StaticData>

</NodeType>
/Settings/types/page/Form.aspx
<%@ Page Language="C#" Inherits="Deepcode.Flux.Core.UI.CMS.CMSContentForm" ValidateRequest="false"%>
<%@ Register TagPrefix="flux" Namespace="Deepcode.Flux.Core.UI.Controls" Assembly="Deepcode.Flux.Core"%>
<script runat="server">
// Type ID being managed by this form
protected override string FormTypeCode { get { return "Page"; } }
// Do form setup
protected override void SetupForm(int ContentID, int ParentID)
{
if (!Page.IsPostBack)
{
fPath.NodeIDParent = ParentID;
fPath.NodeIDPathed = ContentID;
}
}
// Save fields to content object
protected override void SaveContent(ref Deepcode.Flux.Core.Systems.CMS.ContentObject save)
{
save.NodeName = this.fPath.Text;
save.NodeTitle = this.fPageTitle.Text;
save.Fields["MenuTitle"] = this.fMenuTitle.Text;
save.Fields["BodyContent"] = this.fHtml.Text;
}
// Load fields from content object
protected override void LoadContent(Deepcode.Flux.Core.Systems.CMS.ContentObject load)
{
this.fPath.Text = load.NodeName;
this.fPageTitle.Text = load.NodeTitle;
this.fMenuTitle.Text = load.Fields["MenuTitle"];
this.fHtml.Text = load.Fields["BodyContent"];
}
</script>
<html>
<head id="Head1" runat="server">
<link href="../../../admin/Asset/Style/GeneralStyle.css" rel="Stylesheet" type="text/css" />
</head>
<body class="nopadshaded">
<form id="form1" runat="server">
<flux:HostTable ID="HostTable1" runat="server">
<%-- Summary --%>
<flux:ValidationSummarySection ID="ValidationSummarySection1" runat="server" HeaderText="Please correct the following errors"/>
<%-- Form area --%>
<flux:Section ID="Section1" runat="server" Title="Add/Edit Page">
<flux:ShadePadBox ID="ShadePadBox1" runat="server">
<table cellspacing="0" cellpadding="3" border="0">
<tr><td>Path:</td>
<td><flux:NodePath runat="server" ID="fPath" Width="200px" MaxLength="100"/></td>
</tr>
<tr><td>Page Title:</td>
<td><asp:TextBox runat="server" ID="fPageTitle" Width="300px" MaxLength="500"/></td>
</tr>
<tr><td>Title for menus:</td>
<td><asp:TextBox runat="server" ID="fMenuTitle" Width="300px" MaxLength="50"/></td>
</tr>
</table>
</flux:ShadePadBox>
</flux:Section>
<flux:Section ID="Section2" runat="server" Title="Page Content">
<asp:TextBox runat="server" ID="fHtml" Width="100%" Height="150px" />
</flux:Section>
<%-- Buttons --%>
<flux:Section ID="Section3" runat="server">
<flux:PadBox ID="PadBox1" CssClass="Pad5Button" runat="server">
<asp:Button runat="server" ID="btnSave" Text="Save" OnClick="btnSave_Click" CssClass="button"/>
<asp:Button runat="server" ID="btnCancel" Text="Cancel" OnClick="btnCancel_Click" CausesValidation="False"/>
</flux:PadBox>
</flux:Section>
<%-- Validators --%>
<asp:RequiredFieldValidator ID="RequiredFieldValidator1" runat="server" ControlToValidate="fPath"
ErrorMessage="You must specify the path for this page" Display="None"/>
<asp:RequiredFieldValidator ID="RequiredFieldValidator2" Runat="server" ControlToValidate="fPageTitle"
ErrorMessage="You must specify the title of this page" Display="None"/>
</flux:HostTable>
</form>
</body>
</html>
Step 7 - creating some content

1. Open the administration console (http://localhost/[youralias]/admin/) and select "Content Management" from the right hand menu. You should be presented with an empty cms as follows;
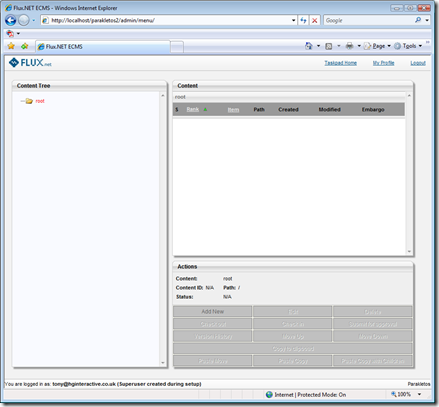
2. Click "Add new" in the actions panel and you will be presented with the new "website channel" form which we defined earlier. This is presented immediately without asking what sort of content you wish to create as it's the only type that can be added to the root like this.
3. Enter test for the channel name and path as below and click save.

4. Now click the "test" node in the tree view to the left and then click "Add new". This will present the form for adding a page, again as defined above. Define a home page as follows;

5. Repeat the process to create another new page called "About us".
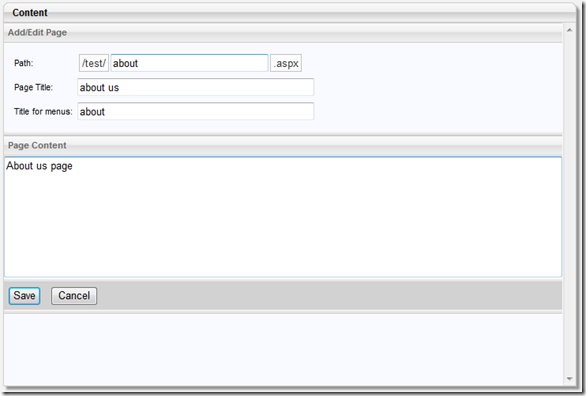
6. You should now have a site defined as follows;

7. And you will notice that all of your pages presently are shown with a green icon indicating they are checked out for editing by you.

8. In order for this content to appear on the site, it must be checked in, and optionally validated through the workflow processes. An easy way to check everything in quickly is to go back to the admin home page and select the items that are checked out to you and check them all in in one go. Alternatively, select each in turn and click check-in.
9. Once they are checked in they should present in blue;

Step 7a - using a WYSIWYG editor
A downside to what we've seen so far is our editor is free text. It doesn't allow us to write bold, italics, insert images etc. As such, we would normally obtain a WYSIWYG editor and embed that instead. In this instance, you could grab the latest version of FCKEditor, which is my favourite editor that works well across all browsers. Normally we'd download FCK editor's latest source and then apply flux specific changes to it, to allow the editor to use the standard flux asset and link browsers. Feel free to use this process, or to save time, you can download the basic starter kit which I am producing as a result of this article from our codeplex site. For those interested however, to use a WYSIWYG editor like this we would;
1. Download the latest FCKEditor and apply flux specific changes to it (replace the asset and link browser).
2. Extract it's contents to a folder in your site called /FCKEditor
3. Copy the FredCK.FCKEditorV2.dll into your site's Bin directory.
4. Create a folder in settings called common and create a custom user control in there with the name fckEditor.ascx. The content of the ASCX should be as follows;
<%@ Control Language="C#" AutoEventWireup="true" %>
<%@ Register TagPrefix="fck" Namespace="FredCK.FCKeditorV2" Assembly="FredCK.FCKEditorV2" %>

<script runat="server">
    public string Value
    {
        get
        {
            return fContent.Value;
        }

        set
        {
            fContent.Value = value;
        }
    }

    protected void Page_Load(object sender, EventArgs e)
    {
        if (!Page.IsPostBack)
        {
            fContent.BasePath = "~/FCKEditor/";
            fContent.ToolbarSet = "Default";
        }
    }
</script>

<fck:FCKeditor runat="server" ID="fContent" Height="200px"/>
5. We then replace the textbox in form.aspx for the Page content type;
6. From here, the editor should allow us to display html etc.

Step 8 - setting up mappings and wiring it up
Flux is capable of doing URL re-writing for you, and is capable of being multi-homed against different domains etc as a result. In order to tell flux which folder to get it's content from for different domains and which page is the home page, we need to use the mapping tool.

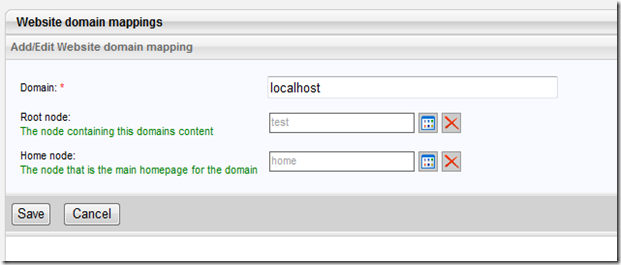
1. Open website mappings and select to add a new mapping
2. The domain we're adding a mapping for during development here is localhost, so enter that into the domain field.
3. Select the "test" root node as the site's content root node - this determines which node contains all the content for this domain.
4. Select the "home" node as the site's home page node.

5. Click save. You have successfully setup the mapping between the domain and the content.
6. As flux doesn't force you to use the URL re-writer engine, we must now hook this up in code. Create a default.aspx web form in the root of your site and set it's content as follows; This simply redirects to the correct URI whenever someone accesses the site.
<%@ Page Language="C#" %>
<%@ Import Namespace="Deepcode.Flux.Core.Systems.URLRewriter"%>

<script runat="server">
protected void Page_Load()
{
    Rewriter rw = new Rewriter();
    rw.RewriteFromHome( Context );
}
</script>
Step 9 - Writing the rendering template for the worlds most basic content type
With the domain maps etc in place, we're ready now to show the content we've created to the world. If you navigate now to your site, you will get an error saying it can't find the render template for the page. That's because we still need to create it.
1. Create a new web form - /settings/types/page/render.aspx and set it's content as follows;
<%@ Page Language="C#"%>
<%@ Import Namespace="Deepcode.Flux.Core.Systems.CMS" %>
<%@ Import Namespace="System.Linq" %>
<script runat="server">
protected ContentObject Content { get; private set; }
protected override void OnLoad(EventArgs e)
{
Content = ContentQuery.GetByID(Int32.Parse(Request["nodeid"]));
if (Content == null) Response.Redirect("~/", true);
Page.Title = Content.NodeTitle;
html.Text = Content.Fields["BodyContent"];
// Get the menu together by querying everything within my parent....
ContentQuery query = new ContentQuery();
query.BaseMatch.AND(new StaticFieldMatch(
ContentStaticField.ParentID,
ContentQueryOperator.EQ,
Content.FK_ParentID));
menu.DataSource = from c in query.GetMatching()
select new
{
Url = Page.ResolveUrl(String.Format("~/{0}/{1}.aspx",
c.NodePath, c.NodeName)),
Title = c.NodeTitle };
menu.DataBind();
base.OnLoad(e);
}
</script>
<html>
<head runat="server"/>
<body>
<div>
<asp:Repeater ID="menu" runat="server">
<ItemTemplate>
<a href="<%#Eval("Url")%>">[<%#Eval("Title")%>]</a> ·
</ItemTemplate>
</asp:Repeater>
</div>
<asp:Literal ID="html" runat="server"/>
</body>
</html>
You should now be able to navigate to your site and view a basic page with a simple menu:


Step 10 - What next?
Well, that was the overview for how to get a basic CMS up and running. It's quite complex, but this means that flux isn't prescriptive about anything - if you don't want to use it to define the actual structure of your site, you don't have to, you can use it as a content repository, and ask it for content as necessary. In fact this approach works quite well when building complex sites. You can even setup flux to work with the excellent ASP.NET MVC framework. Simply have one site for the admin and another site (the MVC app) for the front end, which in turn uses the flux API's to get at it's data.
Whilst this was an overview, I am intent now on packaging this as a sample onto codeplex (http://flux.codeplex.com) so that it can be used as a starting point very quickly without repeating all the steps above.
Notes on live deployment
When installing your finished product onto your deployment site, chances are you are installing to a shared environment where IIS is already configured for you and the database is already created, but empty. In this case, all you need to do to deploy the first time is;
- FTP all of your files up to the server
- On the first instance, delete settings/flux.config so that the database scripts are executed
- Login to http://[yoursite.com]/admin/setup/install/ to walk through the installation process
- Create your content and domain mappings.....
From then on, if you change your template code etc, you just need to re-deploy your files.