Thursday, 24 June 2010

Display issues with the new editor in VS2010

I’m having major issues with the new editor in VS2010. The source window corrupts so often that it’s sometimes un-usable. This morning for instance, I’m opening .JS files and am getting the following corruption;

image

In addition if I have two files open, and I CTRL-TAB to switch between them, the display doesn’t refresh, so it appears that file 2 has the same source as file 1. I have the latest display drivers etc, and my laptop is a 6Gb Lenovo W500, so performance shouldn’t really be an issue.

The only way I’ve been able to resolve this is by zooming the editor in and back out again to force it to redraw it’s contents, but other than that, this is just a rant… I have no real solution, sorry.

Friday, 7 May 2010

T4 template to exclude LINQ to SQL generated classes from code analysis

I often use the sqlmetal tool to generate a L2SQL model from a database as follows;

sqlmetal /server:(local) /database:myDatabaseName 
         /views /functions /sprocs
         /code:..\UI\Models\LinqSql\myDatabaseName_gen.cs
         /language:C# /namespace:myProject.UI.Models.LinqSql
         /context:myDatabaseContext /pluralize

This then generates all of my database structure out to LINQ to SQL classes, eg;

  1. [global::System.Data.Linq.Mapping.TableAttribute(Name="dbo.Bills")]
  2. public partial class Bill : INotifyPropertyChanging, INotifyPropertyChanged

However, with FxCop code analysis turned on (you DO have it turned on and set to error don’t you!?!?), this then results in a bunch of errors from the generated code. Such as CA2227, about making collections read only;

image

However, this is generated code, but sqlmetal by default doesn’t add the necessary attributes to exclude the code from code analysis (Adding the GeneratedCodeAttribute). You could manually edit the generated code each time you run sqlmetal in order to add this attribute, or manually maintain a file of partial classes with the attributes added there. I wanted something a bit more elegant though, so went off looking at T4 templates.

T4 templates allow us to write template based code that will generate the actual source code either when you save the template, when you manually “run custom tool” or by incorporating it into your build process. T4 templates use an ASP.NET type syntax, but slightly different. First of all, I heartily recommend you get the T4 template editor from these guys: http://t4-editor.tangible-engineering.com/ the free version is fine and gives you syntax hilighting and intellisense, which is missing in VS 2010.

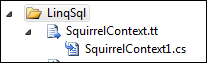
Simply adding a .TT file to your solution, then writing the template code results in a code file being generated for you, nested within the .TT file;

image

Within this template, I am able to get a handle on the containing project, inspect the code model and generate partial classes with the necessary GeneratedCodeAttribute applied. This results in the following class being generated.

using System.CodeDom.Compiler;

namespace myProject.UI.Models.LinqSql
{
    [GeneratedCode("T4 LinqSqlFixer", "1.0")]
    public partial class EntityA {}

    [GeneratedCode("T4 LinqSqlFixer", "1.0")]
    public partial class EntityB {}

    [GeneratedCode("T4 LinqSqlFixer", "1.0")]
    public partial class EntityC {}

    [GeneratedCode("T4 LinqSqlFixer", "1.0")]
    public partial class Bill {}
}

With this in place, code analysis now ignores the generated LINQ SQL code and I don’t have to muck around suppressing errors or, God forbid, turn off code analysis all together.

My full T4 template is as follows;

<#@ template hostSpecific="true" #>
<#@ assembly name="System.Core.dll" #>
<#@ assembly name="EnvDTE.dll" #>
<#@ import namespace="EnvDTE" #>
<#@ import namespace="System.Collections.Generic" #>

/*
This file was generated by a T4 Template. It attempts to add the GeneratedCode
attribute to any classes generated by sqlmetal - provided your sqlmetal classes
are in an isolated namespace.

The reason being, if the GeneratedCode attribute is not associated with the
generated classes, they are anaylsed by the code analysis tool.

Don't modify the generated .cs file directly, instead edit the .tt file.
*/
using System.CodeDom.Compiler;

<#
    // HERE: Specify the namespaces to fix up
    FixClassNameSpaces("myProject.UI.Models.LinqSql");
#>

<#+
void FixClassNameSpaces(string fixNamespace)
{
    WriteLine("namespace {0}\r\n{{", fixNamespace);
    string [] classes = GetClassesInNamespace(fixNamespace);
    foreach( string className in classes )
    {
        WriteLine("\t[GeneratedCode(\"T4 LinqSqlFixer\", \"1.0\")]");
        WriteLine("\tpublic partial class {0} {{}}\r\n", className);
    }
    WriteLine("}");
}

string [] GetClassesInNamespace(string ns)
{
    List<string> results = new List<string>();
    IServiceProvider host = (IServiceProvider) Host;
    DTE dte = (DTE) host.GetService(typeof(DTE));
    ProjectItem containingProject = dte.Solution.FindProjectItem(Host.TemplateFile);
    Project project = containingProject.ContainingProject;
    CodeNamespace nsElement = SearchForNamespaceElement(project.CodeModel.CodeElements, ns);
    if( nsElement != null )
    {
        foreach( CodeElement code in nsElement.Members )
        {
            if( code.Kind == vsCMElement.vsCMElementClass )
            {
                CodeClass codeClass = (CodeClass) code;
                results.Add( codeClass.Name );
            }
        }
    }
    return results.ToArray();
}

CodeNamespace SearchForNamespaceElement( CodeElements elements, string ns )
{
    foreach( CodeElement code in elements )
    {
        if( code.Kind == vsCMElement.vsCMElementNamespace )
        {
            CodeNamespace codeNamespace = (CodeNamespace)code;

            if( ns.Equals(code.FullName) )
            {
                // This is the namespace we're looking for
                return codeNamespace;
            }
            else if( ns.StartsWith(code.FullName))
            {
                // This is going in the right direction, descend into the namespace
                return SearchForNamespaceElement(codeNamespace.Members, ns);
            }
        }
    }
    return null;
}
#>

Friday, 16 April 2010

Programmatically clear down K2 process information?

In K2, your development environment can become very cluttered, very quickly. I searched for a tool to be able to clear down all of the process instance data for processes that were still running and the archive/log data for processes that have completed to give me a clear, pristine and virginal K2 workspace ready to muck up again with more work in progress processes :)

That tool didn’t exist, so I wrote my own (and it was surprisingly simple!). Here are the key components.

First of all, to clear all currently running, active or errored process instances;

  1. WorkflowManagementServer server = new WorkflowManagementServer();
  2. try
  3. {
  4.     K2Connection.CreateConnection(server);
  5.  
  6.     ProcessInstanceCriteriaFilter filter = new ProcessInstanceCriteriaFilter();
  7.  
  8.     foreach (ProcessInstance instance in server.GetProcessInstancesAll(filter))
  9.         server.DeleteProcessInstances(instance.ID, true);
  10. }
  11. catch (Exception ex)
  12. {
  13.     Program.Error(ex);
  14. }
  15. finally
  16. {
  17.     server.Connection.Close();
  18. }

And secondly, the log data – this comes from a separate database which needs to be archived out.

  1. // Create archive temp db
  2. try
  3. {
  4.     CreateSqlTempDb();
  5. }
  6. catch (Exception)
  7. {
  8.     // ... code elided for clarity ...
  9.     return;
  10. }
  11.  
  12. WorkflowManagementServer server = new WorkflowManagementServer();
  13. try
  14. {
  15.     K2Connection.CreateConnection(server);
  16.     server.Archive(ArchiveConnectionString, "K2ServerLog", "_Archive", DateTime.Now.AddMonths(-24), DateTime.Now);
  17. }
  18. catch (Exception)
  19. {
  20.     // ... code elided for clarity ...
  21. }
  22. finally
  23. {
  24.     server.Connection.Close();
  25. }
  26.  
  27. try
  28. {
  29.     DropSqlTempDb();
  30. }
  31. catch (Exception ex)
  32. {
  33.     // ... code elided for clarity ...
  34. }

CreateSqlTempDb and DropSqlTempDb simply create and drop an empty database in SQL, which the archive tool then moves the data to. The ArchiveConnectionString is a standard connection string to the archive db you create.

Obviously you don’t want to be running this on ANY production environments!!!!

Update existing sharepoint content types when deploying using a feature

I’ve been a little quiet recently, mainly because I’ve had my head down with a large SharePoint and K2 blackpearl project in Manchester, in which I’ve got lots to blog about but just haven’t had the time. However, I think this is pretty important - today I solved a little problem that was bugging me.

My scenario is this;

We have SharePoint sites, created from STP files as part of our line of business application (I know, I know, the STP bit is a bit stupid and it’s hard to update, but we are where we are), and the document libraries within these created sites use content types deployed in the root site which are defined and deployed with a feature.

I needed to add a new field to one of the content types and remove a field from another one. Sounds easy enough – I updated the XML for the definition, redeployed and the definition in the site content type library updated as expected. What I didn’t expect though was all the sites already provisioned didn’t get those changes applied, and even worse, when I provisioned a new site (from the STP) the document library in that also didn’t have the changes. It was almost like the site document libraries had their own copy of the content types.

Of course that’s EXACTLY what the problem is. Solution 1 is not to deploy changes through the features. Using the UI to add or remove the columns as necessary and select the option to also update anything that uses that content type. For me this is a non starter – I’d have to re-export all my STPs so that future provisioned sites get the changes as well as make the manual changes to the content type and remember to propagate down – something that doesn’t sit well with my build and deploy strategy.

So, I found another solution. By attaching a feature receiver I can programmatically change content types and have those changes propagated down through everything that uses it. It’s still not ideal, but it works well. I keep my XML definition static and apply additive changes through the feature receiver in code, which looks like this;

  1. public class ContentTypeFeatureReceiver : SPFeatureReceiver
  2. {
  3.     /// <remarks/>
  4.     [SharePointPermission(SecurityAction.LinkDemand, ObjectModel = true)]
  5.     public override void FeatureInstalled(SPFeatureReceiverProperties properties)
  6.     {
  7.     }
  8.  
  9.     /// <remarks/>
  10.     [SharePointPermission(SecurityAction.LinkDemand, ObjectModel = true)]
  11.     public override void FeatureUninstalling(SPFeatureReceiverProperties properties)
  12.     {
  13.     }
  14.  
  15.     /// <remarks/>
  16.     [SharePointPermission(SecurityAction.LinkDemand, ObjectModel = true)]
  17.     public override void FeatureActivated(SPFeatureReceiverProperties properties)
  18.     {
  19.         SPSite site = properties.Feature.Parent as SPSite;
  20.         if (site == null)
  21.             return;
  22.  
  23.         SPWeb rootWeb = site.RootWeb;
  24.  
  25.         // Here, modify any of the existing content types
  26.         rootWeb.AddFieldToContentType("FieldToAdd", "Content Type Add To");
  27.         rootWeb.RemoveFieldFromContentType("FieldToRemove", "Content Type To Remove From");
  28.     }
  29.  
  30.     /// <remarks/>
  31.     [SharePointPermission(SecurityAction.LinkDemand, ObjectModel = true)]
  32.     public override void FeatureDeactivating(SPFeatureReceiverProperties properties)
  33.     {
  34.     }
  35.  
  36. }

The AddFieldToContentType and RemoveFieldFromContentType methods are extension methods as follows;

  1. public static class SPWebExtensions
  2. {
  3.     /// <remarks/>
  4.     public static void AddFieldToContentType(this SPWeb site, string fieldName, string contentTypeName)
  5.     {
  6.         if (!site.Fields.ContainsField(fieldName))
  7.         {
  8.             Console.WriteLine("Could not add {0} to {1} - the field {0} does not exist!", fieldName, contentTypeName);
  9.             return;
  10.         }
  11.  
  12.         SPField field = site.Fields[fieldName];
  13.         SPContentType contentType = site.ContentTypes[contentTypeName];
  14.         if (contentType == null)
  15.         {
  16.             Console.WriteLine("Could not add {0} to {1} - the content type {1} does not exist!", fieldName, contentTypeName);
  17.             return;
  18.         }
  19.  
  20.         if (contentType.FieldLinks[field.InternalName] != null) return;
  21.         contentType.FieldLinks.Add(new SPFieldLink(field));
  22.         contentType.Update(true);
  23.     }
  24.  
  25.     /// <remarks/>
  26.     public static void RemoveFieldFromContentType(this SPWeb site, string fieldName, string contentTypeName)
  27.     {
  28.         if (!site.Fields.ContainsField(fieldName))
  29.         {
  30.             Console.WriteLine("Could not remove {0} from {1} - the field {0} does not exist!", fieldName, contentTypeName);
  31.             return;
  32.         }
  33.  
  34.         SPField field = site.Fields[fieldName];
  35.         SPContentType contentType = site.ContentTypes[contentTypeName];
  36.         if (contentType == null)
  37.         {
  38.             Console.WriteLine("Could not remove {0} from {1} - the content type {1} does not exist!", fieldName, contentTypeName);
  39.             return;
  40.         }
  41.         if (contentType.FieldLinks[field.InternalName] == null) return;
  42.         contentType.FieldLinks.Delete(field.InternalName);
  43.         contentType.Update(true);
  44.     }
  45. }

Finally, you still have to define the site column before you can attach it.

Friday, 12 February 2010

Unexpected property persistence in a web part

I’m writing a web part at the moment, which, to cut a long story short, tracks a bunch of properties between post-backs using view state as you might expect;

image

What I’ve found though is that if I add one of these web parts to my page and then use it so that CurrentPage is set to, say, 5 and then edit the web part configuration, this property gets persisted too - coming back to the page later defaults current page to 5! Is this a bug or does SharePoint insist on persisting all properties during configuration? Even though I haven’t added any attributes to tell it do so?

All I know is the only way I could get rid of this behaviour is to make the property protected or private, which isn’t a big deal, but it’s confusing that this happens at all.

Wednesday, 10 February 2010

Balsamiq Mockups - Review

Since the dawn of time, I’ve been producing user interface mock ups for my projects, using them not only to specify what I’m building, but also to workshop these ideas and concepts with users. They ultimately form documentation passed to developers along with the use cases and data model etc. I’ve always found the process of creating UI mocks quite tedious (cutting and pasting in something like fireworks for instance) and find that the more fidelity I put into these diagrams, the more users don’t provide valuable feedback. They either;

  • Become afraid to comment fearing that I will be offended by their input or
  • Concentrate too much of trivial issues like the exact spacing between fields in the image, thinking it’s the final UI

High fidelity diagrams offer an illusion of accuracy and therefore trigger these states of mind, and the cumbersome nature of the tools means I wouldn’t work with the users directly on the designs in workshops, so overall I tend to not share the screen annotations with the users directly, preferring instead to use just a whiteboard and then use the formal annotations just for the technical team.

However, this week I’ve got my hands on a tool called Balsamiq Mockups, which is an easy to use tool that offers a white-board type interface and low fidelity design elements. I decided to use it to mock up a new sharepoint data grid control I needed to build:

image

I produced this in about 15 minutes and it offers a good, low fidelity idea of how the UI should function that I can share with both the technical team and the users. The users will feedback honest ideas as they won’t be afraid to insult the low fidelity diagram and they won’t get bogged down with the details and colours of the UI. At the same time, I can share this with the developers and they won’t lose their initiative on how the forms should be implemented as it’s clearly not that prescriptive.

The tool is very simple to use, is extensible with new control sets from Mockups to Go, exports to a variety of formats, and the different mockups can be linked together. Overall you can use this tool for just about anything. I’ve just bought 3 licences for the analysts and architects on my current project (it’s reasonably priced too!).

The one thing I won’t do though is start using this as a replacement for the whiteboard sessions with the users. Sure, you could easily sit with them and design UI’s on a projector using this toolset, but I just find the whole whiteboard, scribbling and chatting method far more tactile. I’ll document those workshops using Balsamiq though and use that as part of the documentation sets for the technical and business teams respectively.

Wednesday, 9 December 2009

Building an ASP.NET MVC E-Commerce app with Flux – Part 3

Now that we know the MVC application is able to get to data in Flux using the API (did we expect anything less), we can look at making this do something useful. In this article we will;

  • Introduce a link on the main site called “Help centre” which will take it’s content from a channel we will define (see previous article)
  • Implement a content type to define general content pages for the help centre
  • Implement a controller and view that will render these general content pages
  • Have the general content page list a table of contents where there is content beneath them in the hierarchy or render a link back to the parent if there is content above them.

With this, we’ll be able to re-create the help content sections that you would normally find on most e-commerce sites.

Before I kick off with this one though, I should point out a couple of things. In no way shape or form is this lot production ready code! In an effort to be concise, and to the point, you’ll find quite stupid things in here like:

image

Which in a production site is a no-no. We should treat the content we’re rendering as unsafe and un-trusted and not just render it out willy-nilly like this. Also, you’ll notice no polishing like WYSIWYG editing in this sample – see my previous post on how to achieve this using fckEditor. I leave the removal of stupidity and the polishing as an exercise for the reader :)

Ok, so, here’s the final product of this article;

image

and

image

1. The “Help Center” link

The easiest part here – we created the help center link in the master page as follows;

                <ul id="menu">              
                    <li><%= Html.ActionLink("Home", "Index", "Home")%></li>
                    <li><%= Html.ActionLink("Help Center", "HelpCenter", "Page")%></li>
                </ul>

This creates a link to the controller called PageController which will invoke the method HelpCenter. We then need to wire up the controller for this, but before we do any of that we may as well go ahead and setup flux to support the page content we need.

2. The new flux content type

In flux we define a new content type for a content type called “Page” by creating a new folder containing a new XML type config and the administration form, as below. We also modify the channel content type definition to tell it to allow “Page” types to be added as children.

image

The code for the page content.type.config is as follows;

<NodeType ID="Page" Name="Simple Page Content" LimitVersions="10">

    <AddForm>~/settings/types/Page/form.aspx</AddForm>
    <EditForm>~/settings/types/Page/form.aspx</EditForm>

    <Relationships AddRoot="false">
        <Add>Page</Add>
    </Relationships>

</NodeType>

And the form.aspx content:

<%@ Page Language="C#" Inherits="Deepcode.Flux.Core.UI.CMS.CMSContentForm" ValidateRequest="false"%>
<%@ Register TagPrefix="flux" Namespace="Deepcode.Flux.Core.UI.Controls" Assembly="Deepcode.Flux.Core"%>

<script runat="server">
    // Type ID being managed by this form
    protected override string FormTypeCode { get { return "Page"; } }

    // Do form setup
    protected override void SetupForm(int ContentID, int ParentID)
    {
        if (!Page.IsPostBack)
        {
            fPath.NodeIDParent = ParentID;
            fPath.NodeIDPathed = ContentID;
        }
    }

    // Save fields to content object
    protected override void SaveContent(ref Deepcode.Flux.Core.Systems.CMS.ContentObject save)
    {
        save.NodeName = this.fPath.Text;
        save.NodeTitle = this.fPageTitle.Text;
        save.Fields["body"] = this.fContent.Text;
    }

    // Load fields from content object
    protected override void LoadContent(Deepcode.Flux.Core.Systems.CMS.ContentObject load)
    {
        this.fPath.Text = load.NodeName;
        this.fPageTitle.Text = load.NodeTitle;
        this.fContent.Text = load.Fields["body"];
    }
</script>

<html>
<head id="Head1" runat="server">
    <link href="../../../admin/Asset/Style/GeneralStyle.css" rel="Stylesheet" type="text/css" />
</head>
<body class="nopadshaded">
<form id="form1" runat="server">
<flux:HostTable ID="HostTable1" runat="server">

<%-- Summary --%>
<flux:ValidationSummarySection ID="ValidationSummarySection1" runat="server" HeaderText="Please correct the following errors"/>

<%-- Form area --%>
    <flux:Section ID="Section1" runat="server" Title="Add/Edit Simple Page Content">
    <flux:ShadePadBox ID="ShadePadBox1" runat="server">

        <table cellspacing="0" cellpadding="3" border="0">
        <tr><td>Path:</td>
            <td><flux:NodePath runat="server" ID="fPath" Width="200px" MaxLength="100"/></td>
            </tr>

        <tr><td>Page Title:</td>
            <td><asp:TextBox runat="server" ID="fPageTitle" Width="300px" MaxLength="500"/></td>
            </tr>
        </table>

    </flux:ShadePadBox>
    </flux:Section>
    
    <flux:Section runat="server" Title="Page Content">
        <asp:TextBox runat="server" ID="fContent" Width="100%" Height="200px" TextMode="MultiLine"/>
    </flux:Section>

<%-- Buttons --%>
<flux:Section ID="Section3" runat="server">
<flux:PadBox ID="PadBox1" CssClass="Pad5Button" runat="server">
    <asp:Button runat="server" ID="btnSave" Text="Save" OnClick="btnSave_Click" CssClass="button"/>&nbsp;&nbsp;&nbsp;
    <asp:Button runat="server" ID="btnCancel" Text="Cancel" OnClick="btnCancel_Click" CausesValidation="False"/>
</flux:PadBox>
</flux:Section>

<%-- Validators --%>
<asp:RequiredFieldValidator ID="RequiredFieldValidator1" runat="server" ControlToValidate="fPath"
    ErrorMessage="You must specify the path for this page" Display="None"/>

<asp:RequiredFieldValidator ID="RequiredFieldValidator2" Runat="server" ControlToValidate="fPageTitle" 
    ErrorMessage="You must specify the title of this page" Display="None"/>


</flux:HostTable>

</form>
</body>
</html>

That then gives us this very simple management form in flux that we can use to define content.

image

We need to go ahead and create some content for our help and support centre. the way I chose to structure this is to expect a channel path of /content/articles and a page node within that with a name of “HelpHome”. This would be the main help and support centre content page, and the child pages within that would cover the individual topics (see the images at the beginning of the post) – go ahead and create some content now.

image

3. and 4. - Rendering the general content pages

Being MVC, we need to consider the model (the data we’re going to render), the controller (the, um, controller of the app) and the view (the aspx code to render the model).

The controller is implemented as follows;

using System.Web.Mvc;
using MVCStore.Models;

namespace MVCStore.Controllers
{
    [HandleError]
    public class PageController : Controller
    {
        readonly ContentModel _modelProvider = new ContentModel();

        [AcceptVerbs(HttpVerbs.Get)]
        public ActionResult HelpCenter()
        {
            return View("PageContent", _modelProvider.GetHelpCentre());
        }

        [AcceptVerbs(HttpVerbs.Get)]
        public ActionResult PageContent(int pageId)
        {
            return View("PageContent", _modelProvider.GetPageForNodeId(pageId));
        }
    }
}

Note the model provider – this is some utility code we’ll build shortly to query the Flux content database. Our two controller methods are HelpCenter - which will get the help centres home page and render it and PageContent – which will use the same mechanics to render any page given the id of the content element.

The content model, which is created in /Models in this case is a mechanism to get the CMS data and return it in a way that the view is expecting. The code for ContentModel is shown below;

using System;
using Deepcode.Flux.Core.Systems.CMS;
using MVCStore.Views.Page;

namespace MVCStore.Models
{
    /// <summary>
    /// Provider to get content out of Flux as required
    /// </summary>
    public class ContentModel
    {
        public PageModel GetHelpCentre()
        {
            ContentQuery query = new ContentQuery();

            // Get the "Page" content item under /content/articles/ with the name "HelpHome"
            query.BaseMatch.AND(new StaticFieldMatch(ContentStaticField.Path, ContentQueryOperator.EQ, "/content/articles/"));
            query.BaseMatch.AND(new StaticFieldMatch(ContentStaticField.ContentType, ContentQueryOperator.EQ, "Page"));
            query.BaseMatch.AND(new StaticFieldMatch(ContentStaticField.Name, ContentQueryOperator.EQ, "HelpHome"));

            // Ensure we have a matching row
            ContentObject [] results = query.GetMatching();
            if (results.Length < 1)
                throw new InvalidOperationException("/content/articles/HelpHome page content does not exist");

            return CreatePageModelForNode(results[0]);
        }

        public PageModel GetPageForNodeId(int nodeId)
        {
            ContentObject node = ContentQuery.GetByID(nodeId);

            // Ensure we have a matching row
            if (node == null)
                throw new InvalidOperationException("content does not exist");

            return CreatePageModelForNode(node);
        }

        private PageModel CreatePageModelForNode(ContentObject node)
        {
            int parentNodeId = -1;
            
            // Only specify a parent IF it's also an item of content
            if (node.ParentLive.FK_STypeID == "Page")
                parentNodeId = node.FK_ParentID;

            PageModel result = new PageModel
            {
                ContentNodeId = node.PK_ID,
                PageContent = node.Fields["body"].Replace("\n", "<br/>"),
                PageTitle = node.NodeTitle,
                ParentNodeId = parentNodeId
            };

            foreach (ContentObject child in node.ChildrenLive)
                result.AddChild(child.PK_ID, child.NodeTitle);

            return result;
        }
    }
}

The GetHelpCentre method uses the content query engine exposed from flux to query for content within the channel path /content/articles, where the type of the entity is Page with a name of HelpHome – this corresponds to the help home page we prescribed earlier. This then assembles from the CMS data through to a PageModel, which is a view specific model that I’ll get to in a second.

The other method, GetPageForNodeId will also return a PageModel but for the content item with the given id number.

The view specific PageModel is;

using System.Collections.Generic;

namespace MVCStore.Views.Page
{
    /// <summary>
    /// View model for rendering page content with table of contents if there are children
    /// and rendering a link back to the parent if there is a parent....
    /// </summary>
    public class PageModel
    {
        public PageModel()
        {
            Children = new List<KeyValuePair<int, string>>();
        }

        /// <summary>
        /// The content id of this node
        /// </summary>
        public int ContentNodeId { get; set; }
        
        /// <summary>
        /// The content id of the parent node
        /// </summary>
        public int ParentNodeId { get; set; }
        
        /// <summary>
        /// The title of the page
        /// </summary>
        public string PageTitle { get; set; }
        
        /// <summary>
        /// The content for the page
        /// </summary>
        public string PageContent { get; set; }

        /// <summary>
        /// The children for this page that we want to list in a TOC
        /// the pairs are node id and page title.
        /// </summary>
        public IList<KeyValuePair<int, string>> Children { get; set; }

        /// <summary>
        /// Adds a child.
        /// </summary>
        /// <param name="nodeId">The node id.</param>
        /// <param name="title">The title.</param>
        public void AddChild(int nodeId, string title)
        {
            Children.Add(new KeyValuePair<int, string>(nodeId, title));
        }
    }
}

The final piece of the puzzle is the view itself, which is extremely simplistic;

<%@ Page Language="C#" MasterPageFile="~/Views/Shared/Site.Master" Inherits="System.Web.Mvc.ViewPage<PageModel>" %>
<%@ Import Namespace="MVCStore.Views.Page"%>

<asp:Content ID="indexContent" ContentPlaceHolderID="MainContent" runat="server">
    
    <%if( Model.ParentNodeId != -1 ){ %>
        <%=Html.ActionLink("Up to parent", "PageContent", "Page", new { pageId = Model.ParentNodeId }, null)%>
    <%}%>
    
    <h2><%=Model.PageTitle%></h2>
    <%=Model.PageContent%>
    
    <%if( Model.Children.Count > 0 ){ %>
    
        <h3>Table of Contents</h3>
        <ul>
            <%foreach( KeyValuePair<int, string> toc in Model.Children ){ %>
            <li><%=Html.ActionLink(toc.Value, "PageContent", "Page", new { pageId = toc.Key }, null)%></li>
            <%}%>
        </ul>
    <%}%>

</asp:Content>

The code is again checked into codeplex here (http://fluxmvcstore.codeplex.com/) to bring you to this point, along with an SQL data script to get the content database up to speed.

I hope this is proving useful. I hope to have the next in the series available over the weekend.

Dont make me WAIT!!! DB Pro - you suck…..

RANT time…. I’m staring at visual studio 2008 at the moment and I’ve been staring at it for the last 25 minutes. I can’t interact with it as it’s busy doing some very complex operation – renaming a folder in a db pro project….. absolute twoddle!!!!!!

Tuesday, 8 December 2009

Building an ASP.NET MVC E-Commerce app with Flux.net as the management tool – Part 2

Continuing the series I started yesterday, today we’ll look at getting some basic content structures defined in Flux along with executing some basic queries for that data from the MVC application.

As ever, follow along or get the source from codeplex here. If you’re using the source, don’t forget to re-create your database so the data in your app matches that created through this article.

Channel content type

As we’re going to be pulling data out of Flux from MVC without using URL re-writing or anything like that, we need a mechanism to address content in flux. We could use the data taxonomy tools to tag data in flux and query based on this, but this lacks form and structure, so I decided to define a channel content type that allows us to expose paths to data that we can easily query against.

For example, when we come to want to find the root categories for our site we’ll perhaps query against /categories and this will have entries for each category, which in turn will have products. We can then extend this later with channels like /content/news to define news articles we might want to list or /content/about to define a list of articles we want to show on the site.

The definition for the channel content type couldn’t be simpler – in the management project, we create a folder at /settings/types called Channel and create the following Content.type.config file;

<NodeType ID="Channel" Name="Content Channel" LimitVersions="1">

    <AddForm>~/settings/types/Channel/form.aspx</AddForm>
    <EditForm>~/settings/types/Channel/form.aspx</EditForm>

    <Relationships AddRoot="true">
        <Add>Channel</Add>
    </Relationships>

</NodeType>

We then add the form.aspx file to manage this content type;

<%@ Page Language="C#" Inherits="Deepcode.Flux.Core.UI.CMS.CMSContentForm" ValidateRequest="false"%>
<%@ Register TagPrefix="flux" Namespace="Deepcode.Flux.Core.UI.Controls" Assembly="Deepcode.Flux.Core"%>

<script runat="server">
    // Type ID being managed by this form
    protected override string FormTypeCode { get { return "Channel"; } }

    // Do form setup
    protected override void SetupForm(int ContentID, int ParentID)
    {
        if (!Page.IsPostBack)
        {
            fPath.NodeIDParent = ParentID;
            fPath.NodeIDPathed = ContentID;
        }
    }

    // Save fields to content object
    protected override void SaveContent(ref Deepcode.Flux.Core.Systems.CMS.ContentObject save)
    {
        save.NodeName = this.fPath.Text;
        save.NodeTitle = this.fPageTitle.Text;
    }

    // Load fields from content object
    protected override void LoadContent(Deepcode.Flux.Core.Systems.CMS.ContentObject load)
    {
        this.fPath.Text = load.NodeName;
        this.fPageTitle.Text = load.NodeTitle;
    }
</script>

<html>
<head id="Head1" runat="server">
    <link href="../../../admin/Asset/Style/GeneralStyle.css" rel="Stylesheet" type="text/css" />
</head>
<body class="nopadshaded">
<form id="form1" runat="server">
<flux:HostTable ID="HostTable1" runat="server">

<%-- Summary --%>
<flux:ValidationSummarySection ID="ValidationSummarySection1" runat="server" HeaderText="Please correct the following errors"/>

<%-- Form area --%>
    <flux:Section ID="Section1" runat="server" Title="Add/Edit Content Channel">
    <flux:ShadePadBox ID="ShadePadBox1" runat="server">

        <table cellspacing="0" cellpadding="3" border="0">
        <tr><td>Path:</td>
            <td><flux:NodePath runat="server" ID="fPath" Width="200px" MaxLength="100"/></td>
            </tr>

        <tr><td>Page Title:</td>
            <td><asp:TextBox runat="server" ID="fPageTitle" Width="300px" MaxLength="500"/></td>
            </tr>
        </table>

    </flux:ShadePadBox>
    </flux:Section>

<%-- Buttons --%>
<flux:Section ID="Section3" runat="server">
<flux:PadBox ID="PadBox1" CssClass="Pad5Button" runat="server">
    <asp:Button runat="server" ID="btnSave" Text="Save" OnClick="btnSave_Click" CssClass="button"/>&nbsp;&nbsp;&nbsp;
    <asp:Button runat="server" ID="btnCancel" Text="Cancel" OnClick="btnCancel_Click" CausesValidation="False"/>
</flux:PadBox>
</flux:Section>

<%-- Validators --%>
<asp:RequiredFieldValidator ID="RequiredFieldValidator1" runat="server" ControlToValidate="fPath"
    ErrorMessage="You must specify the path for this page" Display="None"/>

<asp:RequiredFieldValidator ID="RequiredFieldValidator2" Runat="server" ControlToValidate="fPageTitle" 
    ErrorMessage="You must specify the title of this page" Display="None"/>


</flux:HostTable>

</form>
</body>
</html>

And our basic channel type is defined. We should now be able to use the manager to setup some basic channels – login to http://localhost:55000/ as admin@fluxcms.co.uk with a password of “password” and create some channels as below and then check them all in.

 image

The next thing we need to do is get the MVC application to be able to see this data – to do this we add a reference in the MVC app to Deepcode.Flux.Core.dll (which you’ll find in management/bin). This gives us access to the Flux API, but before we can call it we also need to setup the flux.config in the MVC application. For this I created the /settings directory in the MVC application and copied flux.config from the other project.

Now, we can call the API. In the controller, I added the following (not very elegant) code;

public ActionResult Index()
{
    ContentObject [] list = ContentQuery.GetForParentID(-1);
    ViewData["list"] = list;
    return View();
}

Here, we’re doing a very basic query for all content at the root level, which should give us the categories and content nodes. For now, rather than creating a real model, I’ve just pumped this into view data ready for rendering, and in the view code I added;

    <%foreach(ContentObject obj in (ContentObject []) ViewData["list"]){%>
        <p><%=obj.NodeName%></p>
    <%}%>

Which, … drum roll please …, gives us:

image

WHOOT! Our MVC app is getting it’s data from flux. So we’ve proven the point, we just now need to make it do something useful – but I’ll save that for the next post.

Monday, 7 December 2009

Building an ASP.NET MVC E-Commerce app with FLUX.net as the management tool

A friend of mine was recently contemplating using FLUX to build out an e-commerce application for a store. Whilst this is all well and good, and certainly very plausible, I started to think about how e-commerce sites are generally structured – they aren’t so much about open ended content where you add pages and articles together to form a site, they are far more rigid – more like structured catalogues with prescribed functionality.

As I’m also a fan of the MVC framework (I use it lots in my day job) I’ve been looking for an excuse to build something that uses MVC to render content fed from Flux.NET and I figure this is a good enough opportunity to explore this through a series of blog posts.

The site concept

We’ll manage products and categories in one website, which is standard ASP.NET and using the Flux content management system, then render these to our MVC store front application that has a prescribed structure by querying the content database for data in the appropriate places. Whereas we might normally use flux to dictate the form and structure, in this instance we’re going to use it purely as a management tool for data in our application.

Getting started

I began by downloading the flux starter package and creating a new empty solution. I added an ASP.NET website to the solution and then extracted the starter kit to it, trimming it right down to almost nothing (see image below) and reconfiguring /settings/flux.config to use a new database I created – FluxMVCTest. I ran the flux database script against this db to create my tables etc and then cleared down all the content through the admin tool.

image

With this running and responding on the development web server, I was reasonably happy to proceed and get the MVC site up in the solution too. I added this using the usual new project wizard and then stripped it back to it’s bare essentials also, which at this point gives me two sites in my solution as below;

Follow along source on codeplex

As usual, I’ve started a new project in codeplex for this, so hop along to http://fluxmvcstore.codeplex.com to get the source code so far.