Thursday, 12 May 2011

Real world Orchard CMS – part 3 – creating the twitter widget

As I said in my earlier post, this series is about creating a real world site with Orchard CMS, I’m not covering using Orchard to manage the site, just the technical development parts. All of the code is available on codeplex here: http://orchardsamplesite.codeplex.com/

Preamble
This post is about creating a widget that will render a list of latest twitter feeds on the site. Rather than complicate matters with calling the twitter API, this post will look at building the widget itself and return canned results. Interfacing to twitter itself is left as an exercise for the reader.

Goal
To create a widget that can be added to a page that will display a list of recent tweets;

Background reading and preparation
If you are following along with the series, you should have already completed part 2 to get your theme up and running. As for background reading;

In a later article we will look at how you can build a widget without a model (content record and part), but for now, this is the standard way of constructing a widget for your site.

Lets get started - codegen the module
Open a command line and navigate to the bin directory of the site source. Here you will find orchard.exe, a command line tool for managing orchard and where we will generate our scaffolding for our custom module. Run orchard.exe. Sometimes I get an exception when I try to run the tool, if the same happens to you, just run it again and it should fire up second time round and you will be presented with the orchard shell.

Use codegen to generate the boilerplate code for your module by executing the command;

codegen module SampleSiteModule

Open the project in visual studio
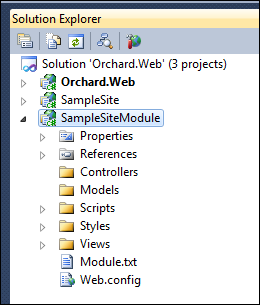
Back in visual studio you can now add the module project to the orchard solution (Right click the solution name in solution explorer and select Add –> existing project). Find the newly created module project under orchard/modules/SampleSiteModule/SampleSiteModule.csproj and select it, you should then have the module project in your solution;
image

Create the record, part, driver and handler
Our widget, when added to a page, will offer the author the ability to specify the twitter user to get tweets for, the number of tweets to obtain and a duration of time to cache the results for before hitting the twitter API again. For this we need to define the fields in a ContentRecord. Within models create a new file – TwitterWidgetRecord.cs as follows;

using Orchard.ContentManagement.Records;
using Orchard.Environment.Extensions;

namespace SampleSiteModule.Models
{
    [OrchardFeature("TwitterWidget")]
    public class TwitterWidgetRecord : ContentPartRecord
    {
        public virtual string TwitterUser { get; set; }
        public virtual int MaxPosts { get; set; }
        public virtual int CacheMinutes { get; set; }
    }
}

This simply defines the class that will represent the data to be persisted for this widget. It derives from ContentPartRecord, which in turn contains the id’s and what not’s to marry this record up to the rest of the data that composes the overall content record. Next, we need to define a ContentPart that wraps this information. Create a new file (again in models) – TwitterWidgetPart.cs;

using System.ComponentModel;
using System.ComponentModel.DataAnnotations;
using Orchard.ContentManagement;
using Orchard.Environment.Extensions;

namespace SampleSiteModule.Models
{
    [OrchardFeature("TwitterWidget")]
    public class TwitterWidgetPart : ContentPart<TwitterWidgetRecord>
    {
        [Required]
        public string TwitterUserName
        {
            get { return Record.TwitterUser; }
            set { Record.TwitterUser = value; }
        }

        [Required]
        [DefaultValue(5)]
        public int MaxPosts
        {
            get { return Record.MaxPosts; }
            set { Record.MaxPosts = value; }
        }

        [Required]
        [DefaultValue(60)]
        public int CacheMinutes
        {
            get { return Record.CacheMinutes; }
            set { Record.CacheMinutes = value; }
        }
    }
}

Next, the handler to tell orchard that we want to store the TwitterWidgetRecord to the database - create models\TwitterWidgetRecordHandler.cs;

using Orchard.ContentManagement.Handlers;
using Orchard.Data;
using Orchard.Environment.Extensions;

namespace SampleSiteModule.Models
{
    [OrchardFeature("TwitterWidget")]
    public class TwitterWidgetRecordHandler : ContentHandler
    {
        public TwitterWidgetRecordHandler(IRepository<TwitterWidgetRecord> repository)
        {
            Filters.Add(StorageFilter.For(repository));
        }
    }
}

Finally to complete this section we need a driver to build the shapes required to render the widget. Create models\TwitterWidgetDriver.cs;

using System;
using Orchard.ContentManagement;
using Orchard.ContentManagement.Drivers;
using Orchard.Environment.Extensions; 
namespace SampleSiteModule.Models
{
[OrchardFeature("TwitterWidget")] public class TwitterWidgetDriver : ContentPartDriver<TwitterWidgetPart> { // GET protected override DriverResult Display(TwitterWidgetPart part, string displayType, dynamic shapeHelper) { return ContentShape("Parts_TwitterWidget", () => shapeHelper.Parts_TwitterWidget( TwitterUserName: part.TwitterUserName ?? String.Empty, Tweets: null)); } // GET protected override DriverResult Editor(TwitterWidgetPart part, dynamic shapeHelper) { return ContentShape("Parts_TwitterWidget_Edit", () => shapeHelper.EditorTemplate( TemplateName: "Parts/TwitterWidget", Model: part, Prefix: Prefix)); } // POST protected override DriverResult Editor(TwitterWidgetPart part, IUpdateModel updater, dynamic shapeHelper) { updater.TryUpdateModel(part, Prefix, null, null); return Editor(part, shapeHelper); } } }

There is quite a bit missing here yet, we need to come back and revisit this driver to actually get the tweets and build the shape correctly. For now, our Display method is constructing a shape called “Parts_TwitterWidget” that will contain properties for the username and a collection of tweets (presently null). The Editor methods build a different part - “Parts_TwitterWidget_Edit” and point to the template file that will be used to present the form for creating one of these widgets.

Creating the service
To actually get the data from twitter (or the canned results in our case) we need a class to represent a tweet and a service to go and get the data. Create a new folder in your project called Services and add a new file – ITwitterService.cs;

using System.Collections.Generic;
using Orchard;
using SampleSiteModule.Models;

namespace SampleSiteModule.Services
{
    public interface ITwitterService : IDependency
    {
        IList<Tweet> GetLatestTweetsFor(TwitterWidgetPart part);
    }
}

That defines the interface for the service – notice the IDependency, that tells the dependency injection framework (AutoFac) to discover this type and provide concrete implementations of it automatically to anything that declares a dependency on it. Our service just offers a single method to get the list of latest tweets based on the configuration specified in the part record. Create CachedTwitterService.cs in the services folder with the following concrete implementation;

using System;
using System.Collections.Generic;
using Orchard.Environment.Extensions;
using SampleSiteModule.Models;

namespace SampleSiteModule.Services
{
    [OrchardFeature("TwitterWidget")]
    public class CachedTwitterService : ITwitterService
    {
        public IList<Tweet> GetLatestTweetsFor(TwitterWidgetPart part)
        {
            List<Tweet> results = new List<Tweet>()
            {
                new Tweet{ DateStamp = DateTime.Now.AddSeconds(-10), Text = "Tweet number three" },
                new Tweet{ DateStamp = DateTime.Now.AddMinutes(-10), Text = "Tweet number two" },
                new Tweet{ DateStamp = DateTime.Now.AddDays(-5), Text = "Tweet number one" }
               };

            return results;
        }
    }
}

In this case, we’re just returning some canned results, your implementation should go off to twitter and get the part.MaxPosts tweets for part.TwitterUserName, push it into a cache for part.CacheMinutes.

The Tweet object being added to the list needs to be defined, so add Tweet.cs to your models directory;

using System;

namespace SampleSiteModule.Models
{
    public class Tweet
    {
        public DateTime DateStamp { get; set; }
        public string Text { get; set; }

        public string FriendlyDate
        {
            get
            {
                TimeSpan span = DateTime.Now - DateStamp;
                if (span.TotalSeconds < 30)
                    return "moments ago.";

                if (span.TotalSeconds < 60)
                    return "Less than a minute ago.";

                if (span.TotalMinutes < 60)
                    return String.Format("{0:0} minute{1} ago", span.TotalMinutes, span.TotalMinutes > 1 ? "s" : "");

                if (span.TotalHours < 24)
                    return String.Format("{0:0} hour{1} ago", span.TotalHours, span.TotalHours > 1 ? "s" : "");

                return String.Format("{0:0} day{1} ago", span.TotalDays, span.TotalDays > 1 ? "s" : "");
            }
        }
    }
}

We can now go back and revisit our driver to have a dependency on this service and invoke it to get the model;

using System;
using Orchard.ContentManagement;
using Orchard.ContentManagement.Drivers;
using Orchard.Environment.Extensions;
using SampleSiteModule.Services;

namespace SampleSiteModule.Models
{
    [OrchardFeature("TwitterWidget")]
    public class TwitterWidgetDriver : ContentPartDriver<TwitterWidgetPart>
    {
        protected ITwitterService Twitter{ get; private set; }

        public TwitterWidgetDriver(ITwitterService twitter)
        {
            Twitter = twitter;
        }

        // GET
        protected override DriverResult Display(TwitterWidgetPart part, string displayType, dynamic shapeHelper)
        {
            return ContentShape("Parts_TwitterWidget",
                () => shapeHelper.Parts_TwitterWidget(
                        TwitterUserName: part.TwitterUserName ?? String.Empty,
                        Tweets: Twitter.GetLatestTweetsFor(part)));
        }

        // GET
        protected override DriverResult Editor(TwitterWidgetPart part, dynamic shapeHelper)
        {
            return ContentShape("Parts_TwitterWidget_Edit",
                () => shapeHelper.EditorTemplate(
                    TemplateName: "Parts/TwitterWidget",
                    Model: part,
                    Prefix: Prefix));
        }

        // POST
        protected override DriverResult Editor(TwitterWidgetPart part, IUpdateModel updater, dynamic shapeHelper)
        {
            updater.TryUpdateModel(part, Prefix, null, null);
            return Editor(part, shapeHelper);
        }
    }
}

Dependency injection will take care of getting the concrete implementation of the ITwitterService passed into the constructor. If you’ve not used dependency injection before (where have you been!), then take a look at the numerous frameworks out there including Castle Windsor, AutoFac (used in Orchard), Unity, StructureMap et al.

Migrations and tidying up some loose ends
Before we come to the views to actually render the widget, we should probably create our migration to tell Orchard what data tables we need and how the widget part is defined. Create a migrations.cs file in your project;

using System.Data;
using Orchard.ContentManagement.MetaData;
using Orchard.Core.Contents.Extensions;
using Orchard.Data.Migration;
using Orchard.Environment.Extensions;
using SampleSiteModule.Models;

namespace SampleSiteModule
{
    [OrchardFeature("TwitterWidget")]
    public class Migrations : DataMigrationImpl
    {
        public int Create()
        {
            // ** Version one - create the twitter widget ** //

            // Define the persistence table as a content part record with
            // my specific fields.
            SchemaBuilder.CreateTable("TwitterWidgetRecord", 
                table => table
                    .ContentPartRecord()
                    .Column("TwitterUser", DbType.String)
                    .Column("MaxPosts", DbType.Int32)
                    .Column("CacheMinutes", DbType.Int32));

            // Tell the content def manager that our TwitterWidgetPart is attachable
            ContentDefinitionManager.AlterPartDefinition(typeof(TwitterWidgetPart).Name,
                builder => builder.Attachable());

            // Tell the content def manager that we have a content type called TwitterWidget
            // the parts it contains and that it should be treated as a widget
            ContentDefinitionManager.AlterTypeDefinition("TwitterWidget",
                cfg => cfg
                    .WithPart("TwitterWidgetPart")
                    .WithPart("WidgetPart")
                    .WithPart("CommonPart")
                    .WithSetting("Stereotype", "Widget"));

            return 1;
        }
    }
}

The create method is invoked when the module is first installed, after that, updates are handled by creating methods in the migration named UpdateFromX() where X is the version to update from. In our create method we tell orchard we need a table for our widget record, that it is a content part record and what fields we intend to store. We then tell the content definition manager to set the twitter widget part as something that can be attached to a content type and then create the TwitterWidget content type itself, composed of our new twitter widget part, and the standard widget and common parts. The stereotype setting just lets orchard know that this is a widget type.

As with the theme in the earlier post, we also need a text file to tell orchard about our module and what it exposes. Create a module.txt file in the project;

Name: SampleSiteModule
AntiForgery: enabled
Author: You
Website: http://www.deepcode.co.uk
Version: 1.0
OrchardVersion: 1.0
Description: Provides widgets and features for the sample site module
Category: Sample Site
Features:
    TwitterWidget:
        Name: Twitter Widget
        Category: Sample Site
        Description: Widget for latest tweets

Again, most of this is obvious, but the features section describes the features that are exposed from the module. Modules can expose multiple features, and we’ll be building on this module later to add more and more features so you will notice that all the code above has the OrchardFeature attribute which indicates to orchard what code is relevant to what features. If your module only has a single feature you probably don’t need to bother with this, but as we’re going to build on it, I set it up for multiple features from the get go. In this case we’re just exposing the twitter widget feature.

Lastly, we need a placement.info file to tell orchard where to put the various shapes we’ve defined in our driver. For more information about placement.info, check out the docs.

<Placement>
    <Place Parts_TwitterWidget="Content:1"/>
    <Place Parts_TwitterWidget_Edit="Content:7.5"/>
</Placement>

Creating the views
When we display our twitter widget, Orchard will look for the template that matches the shape being rendered and it will look in a variety of places, including in the module it is declared in and ultimately in the active theme. This allows module developers to create widgets and functionality with a set of default templates that theme authors can then easily override.

In our case, we defined the shape “Parts_TwitterWidget” when displaying and our driver told orchard to use Parts/TwitterWidget.cshtml for the editor form. As such, create two new razor templates in your module - Views/Parts/TwitterWidget.cshtml and Views/EditorTemplates/Parts/TwitterWidget.cshtml as follows;

Views/Parts/TwitterWidget.cshtml

@using SampleSiteModule.Models

<ul>
    @foreach (Tweet tweet in Model.Tweets)
    {
        <li>@tweet.DateStamp<br/>@tweet.Text<br/>@tweet.FriendlyDate</li>
    }
</ul>

Views/EditorTemplates/Parts/TwitterWidget.cshtml

@model SampleSiteModule.Models.TwitterWidgetPart

<fieldset>
    <legend>Latest Twitter</legend>
    <div class="editor-label">@T("Twitter username"):</div>
    <div class="editor-field">
        @Html.TextBoxFor(m => m.TwitterUserName)
        @Html.ValidationMessageFor(m => m.TwitterUserName)
    </div>
    <div class="editor-label">@T("Number of tweets"):</div>
    <div class="editor-field">
        @Html.TextBoxFor(m => m.MaxPosts)
        @Html.ValidationMessageFor(m => m.MaxPosts)
    </div>
    <div class="editor-label">@T("Cache (minutes)"):</div>
    <div class="editor-field">
        @Html.TextBoxFor(m => m.CacheMinutes)
        @Html.ValidationMessageFor(m => m.CacheMinutes)
    </div>
</fieldset>

Go forth and try it out
If you open orchard now and activate the “Twitter Widget” feature, you can add it to a zone for the homepage layer and you should get;

image

Hopefully that wasn’t too painful. I’m trying to keep the posts as concise as I can yet cover off the main detail.

Real world Orchard CMS - skipping ahead and source

Just a quick note about the source code for the orchard sample series. First off, the source is available here; http://orchardsamplesite.codeplex.com/SourceControl/list/changesets

You will notice that there are multiple folders in the source, one for each article (starting at part-02 as part one was an introductory post), but what I've added tonight is a "final" folder also containing what will ultimately be the finished product from the series.

I figured this would allow me to storm ahead with the code and then go back and split it down into articles to build up the whole whilst allowing those who just want to explore the final solution quick access to the code.

So... Cutting a long story short, if you look in the final folder you'll find the code is much further refined than the part 3 article so far (the twitter widget is fully implemented, the product types are all in place, a content part is there for synopsis content and there are numerous tweaks to the layout and theme). I will get around to trying to explain all this in future parts of the series, but feel free to dive into final for a look at what's coming....

- Posted using BlogPress from my iPad (forgive typos)


Wednesday, 11 May 2011

Real world Orchard CMS – part 2 - creating the theme

As I said in my earlier post, this series is about creating a real world site with Orchard CMS, I’m not covering using Orchard to manage the site, just the technical development parts. All of the code is available on codeplex here : http://orchardsamplesite.codeplex.com/

Preamble
This post is about skinning your first site with your own custom theme, it will cover the basics of how to generate a theme project, open it in visual studio and code up the relevant aspects to make your site look how you want it.

Goal
Our objective is to define and apply a theme for the site as per this mockup;

orchard-kitbag-screenshot

Background reading and preparation
Before you start, you need to get a copy of orchard 1.1 from codeplex, and unzip it to a fresh, empty directory and set it up as per the documentation at http://www.orchardproject.net/docs/Manually-installing-Orchard-zip-file.ashx (follow the section titled “Running the site using visual studio and the visual studio development server”.

After doing that, you should have a working Orchard CMS implementation with the default “theme machine” skin;

Image

Before you start, it’s definitely a good idea to familiarise yourself with how orchard works and the basics of themes and shapes – further reading;

Finally, before beginning you need to have enabled the code generation module as per the following documentation;

Lets get started - codegen the theme scaffolding.
Open a command line and navigate to the bin directory of the site source. Here you will find orchard.exe, a command line tool for managing orchard and where we will generate our scaffolding for our custom theme. Run orchard.exe. Sometimes I get an exception when I try to run the tool, if the same happens to you, just run it again and it should fire up second time round and you will be presented with the orchard shell;

image

Use codegen to generate the boilerplate code for your theme by executing the command;

codegen theme SampleSite /CreateProject:true

Open the project in visual studio
Back in visual studio you can now add the theme project to the orchard solution (Right click the solution name in solution explorer and select Add –> existing project). Find the newly created theme project under orchard/themes/SampleSite/SampleSite.csproj and select it, you should then have the theme project in your solution;

image 

Create the initial code layout
First things first, the main template for the theme will be in the Views folder and will be named layout.cshtml. This will be combined with the default document.cshtml which controls the html/head/body rendering before deferring to your layout.cshtml (this can be overridden in your theme if you feel so inclined, although its rare this would be required).

Our general layout is quite simple, it’s made up of a 960px grid type layout and will expose zones as follows (zones are places where Orchard can push content);

image 

The zones will only be shown if there is some content to show in the zone. As such, the content zone will expand right to fill the side bar zone if there is nothing in there. The layout.cshtml (create it in the views directory) to support this layout is as follows;

   1:  @{
   2:      // Add the site CSS
   3:      Style.Include("site.css");
   4:      
   5:      // Determine which zones are going to be shown
   6:      var displayBasket = (Model.BasketArea != null);
   7:      var displayBodySideBar = (Model.BodySideBar != null);
   8:      var displayBeforeBody = (Model.BeforeBody != null);
   9:      var displayTriPanel = (Model.TriPanelLeft != null) || (Model.TriPanelCenter != null) || (Model.TriPanelRight != null);
  10:      var displayMessages = (Model.Messages != null);
  11:      var displayContent = (Model.Content != null);
  12:      
  13:      // Work out if we need to change the class of the main body area        
  14:      var bodyClasses = displayBodySideBar ? "" : "without-sidebar";
  15:      
  16:      // Adds user sign in, dashboard links etc to the bottom of the page
  17:      WorkContext.Layout.BottomDweller.Add(New.User(), "1");
  18:  }
  19:   
  20:  <div id="layout-header">
  21:      <div id="layout-branding">
  22:          <a href="@Href("~/")" id="layout-branding-home"></a>
  23:          @if( displayBasket )
  24:          {
  25:          <div id="layout-basket-area">@Display(Model.BasketArea)</div>
  26:          }
  27:      </div>
  28:  </div>
  29:   
  30:  <div id="layout-navigation">
  31:      @Display(Model.Navigation)
  32:  </div>
  33:   
  34:  @if( displayMessages )
  35:  {
  36:      <div id="layout-messages" class="zone">
  37:      @Display(Model.Messages)
  38:      </div>
  39:  }
  40:   
  41:  @if (displayBeforeBody)
  42:  {
  43:      <div id="layout-before-body" class="zone">
  44:          <div id="zone-before-body">
  45:              @Display(Model.BeforeBody)
  46:          </div>
  47:      </div>
  48:  }
  49:   
  50:  @if (displayContent || displayBodySideBar)
  51:  {
  52:      <div id="layout-body" class="zone">    
  53:          <div id="zone-body" class="@bodyClasses">
  54:              @Display(Model.Content)
  55:          </div>
  56:   
  57:          @if (displayBodySideBar)
  58:          {
  59:              <div id="zone-body-sidebar">
  60:              @Display(Model.BodySideBar)
  61:              </div>
  62:          }
  63:      </div>     
  64:  }
  65:   
  66:  @if (displayTriPanel)
  67:  {
  68:      <div id="layout-tripanel" class="zone">
  69:          <div id="zone-tripanel-left">
  70:          @Display(Model.TriPanelLeft)
  71:          </div>
  72:          <div id="zone-tripanel-center">
  73:          @Display(Model.TriPanelCenter)
  74:          </div>
  75:          <div id="zone-tripanel-right">
  76:          @Display(Model.TriPanelRight)
  77:          </div>
  78:      </div>
  79:  }
  80:   
  81:  <div id="layout-footer-pad"></div>
  82:  @Display(Model.AfterContent)
  83:  @Display(Model.BottomDweller)

If the template syntax looks strange, go read up about the new Razor view engine in MVC 3, which Orchard uses by default, it’s a much cleaner markup than classic aspx/ascx (although you can still use these if you like). Notice we have two additional zones at the bottom of the layout – AfterContent and BottomDweller – the AfterContent zone is used by a number of modules we will be using to throw javascript into, and so it’s included for this purpose. BottomDweller, you can see we populate this zone with a User shape on line 17, which will render the links to get to the dashboard and sign in etc – I’ve put this in place for convenience, but would probably remove it once I’d finished working on the site.

Define the styles
Next, we need a stylesheet – create “site.css” in the styles folder; (Note you will also need the logo.png file from the source code).

/*  Color Palette
**************************************************************
Top: #848975
Dark: #27320A
BG: #f6fafa
White
Black
Link: #0099ff;
*/
/* Resets
***************************************************************/
html, body, div, span, applet, object, iframe,
h1, h2, h3, h4, h5, h6, p, blockquote, pre,
a, abbr, acronym, address, big, cite, code,
del, dfn, em, font, img, ins, kbd, q, s, samp,
small, strike, strong, sub, sup, tt, var,
dl, dt, dd, ol, ul, li,
fieldset, form, label, legend,
table, caption, tbody, tfoot, thead, tr, th, td {
    margin: 0;
    padding: 0;
    border: 0;
    outline: 0;
    font-weight: inherit;
    font-style: inherit;
    font-size: 100%;
    font-family: inherit;
    vertical-align: baseline;
}
:focus { outline: 0; }
ol, ul { list-style: none; }
table { border-collapse: separate; border-spacing: 0; }
caption, th, td { text-align: left; font-weight: normal; }
blockquote:before, blockquote:after,
q:before, q:after { content: ""; }
blockquote, q { quotes: "" ""; }
header, footer, aside, nav, article { display: block; }

/* Float clears
******************************************************************/
.group:after, .zone:after, .widget-control:after
{
    content: ".";
    display: block;
    height: 0px;
    clear: both;
    visibility: hidden;
}
/* Widgets
***************************************************************/
.widgets {}
.widget h1 { font-size: 1.077em; }
.widget + .widget
{
    margin-top:18px;
}
/* Edit Mode Widgets */
/* These are the edit controls that appear when you're logged-in */
.widget-control { position: relative; border: 1px dotted #5f97af; }
.widget-control .manage-actions { position:absolute; top: 0px; right: 0px; }
.widget-control .manage-actions a { display: block; background-color: #dbdbdb; color: #434343; padding: 3px 6px;  }
.widget-control .manage-actions a:hover { background-color: #434343; color: #fff; text-decoration: none; }

.widget-nav-list{ margin: 0px 0px; padding: 0px 0px; }
.widget-nav{ display: block; background-color: #e9eaeb; padding: 5px 5px; margin-bottom: 3px; }
.widget-nav-active{ background-color: #ff9900; color: White; font-weight: bold; }

/* Content Mode */
.content-control { position: relative; border: 1px dotted #5f97af; }
.content-control .manage-actions { position:absolute; top: 0px; right: 0px; }
.content-control .manage-actions a { display: block; background-color: #dbdbdb; color: #434343; padding: 3px 6px;  }
.content-control .manage-actions a:hover { background-color: #434343; color: #fff; text-decoration: none; }

/* General styling
******************************************************************/
body 
{
    background-color: #f6fafa;

    font-size: 81.3%;    /* Sets 1em = 13px/10pt */
    color: black; 
    font-family: Tahoma, "Helvetica Neue", Arial, Helvetica, sans-serif;
}
h1{ font-size: 2em; }
h1.widget-title{ font-size: 1.1em; font-weight: bold; border-bottom: 1px dotted black; margin-bottom: 8px; padding-bottom: 2px;}
h1.page-title{ font-size: 2em; border-bottom: 1px dotted black; margin-bottom: 8pt; padding-bottom: 2px; }
h2{ font-size: 1.9em; }
h3{ font-size: 1.8em; }
h4{ font-size: 1.5em; }
h5{ font-size: 1.4em; }
h6{ font-size: 1.2em; }

p{ margin: 0 0 1em; line-height: 1.538em; }


a{ color: #0099ff; text-decoration: none; }
a:focus, a:hover{ text-decoration: underline; }

.publishinfo
{
    color: #333;
    font-size: 0.9em;
    margin-bottom: 5px;
}

UL.content-items LI
{
    border-bottom: 1px dotted #333;
    padding-bottom: 10px;
    margin-bottom: 10px;
}
UL.content-items LI.last
{
    border-bottom: none;
    padding-bottom: 0px;
    margin-bottom: 0px;
}

/* Layout
******************************************************************/
#layout-header
{
    background-color: #848975;
    height: 125px;
}
    #layout-branding
    {
        width: 960px;
        height: 125px;
        margin: 0px auto 0px auto;
    }
        #layout-branding-home
        {
            display: block;
            position: relative;
            left: 11px;
            top: 21px;
            width: 235px;
            height: 80px;
            background-image: url(logo.png);
            background-repeat: no-repeat;
        }
        #layout-basket-area
        {
            float: right;
            margin: -30px 20px 0px 0px;
        }

    #layout-navigation
    {
        background-color: #27320A;
        height: 35px;
    }
        #layout-navigation ul 
        {
            display: block;
            padding: 0px;
            margin: 0px auto 0px auto;
            width: 960px;
        }
        #layout-navigation ul li
        {
            display: inline-block;
            padding: 5px 12px;
            margin: 5px 15px;
        }
        #layout-navigation ul li.current 
        {
            background-color: #848975;
            border-radius: 10px; -moz-border-radius: 10px; -webkit-border-radius: 10px;
            text-shadow: 1px 1px 2px rgba(0,0,0,0.5)            
        }
        #layout-navigation ul a 
        {
            font-weight: bold;
            font-size: 1.0em;
            color: white;
            text-decoration: none;
        }

#layout-body, #layout-before-body, #layout-tripanel, #layout-messages
{
    width: 920px;    /* 960 with 20px padding */
    margin: 0px auto 0px auto;
    background-color: White;
    padding: 20px 20px 0px 20px;
}
#layout-messages{ width: 940px; padding: 10px 10px 0px 10px; }
.message, .validation-summary-errors { margin:10px 0 4px 0; padding:4px; }
.messages a { font-weight:bold; }
.message-Information { background:#e6f1c9; /* green */ border:1px solid #cfe493; color:#062232; }
.message-Warning { background:#fdf5bc; /* yellow */ border:1px solid #ffea9b; }
.critical.message, .validation-summary-errors, .message-Error { background:#e68585; /* red */ border:1px solid #990808; color:#fff; }


#layout-footer-pad
{
    width: 960px;
    height: 20px;
    background-color: white;
    margin: 0px auto 0px auto;
}

#zone-before-body
{
    width: 920px;
}

#zone-body /* Default body zone accommodates a right hand 290px zone */
{
    float: left;
    width: 610px;
}
#zone-body.without-sidebar /* Without the sidebar, body fills page */
{
    width: 920px;
}
#zone-body-sidebar
{
    float: right;
    width: 290px;
    margin-left: 20px;
}

#zone-tripanel-left
{
    float: left;
    width: 290px;
    margin-right: 20px;
}
#zone-tripanel-center
{
    float: left;
    width: 300px;
    margin-right: 20px;
}
#zone-tripanel-right
{
    float: left;
    width: 290px;
}

This should all be fairly self explanatory.

Update the theme.txt file
The theme.txt exposes information about this theme to orchard. Open it up and change it as follows;

Name: Sample Site
Author: You
Website: http://www.deepcode.co.uk
Description: My sample site theme
Version: 1.0
Zones: Content,BodySideBar,BeforeBody,TriPanelLeft,TriPanelCenter,TriPanelRight,BasketArea

The format should be quite self explanatory, the Zones section is the only thing that needs some explanation – basically this tells orchard what zones are in use in this layout. This will integrate with the widget system etc to allow you to drop content into these various zones.

Enable the theme
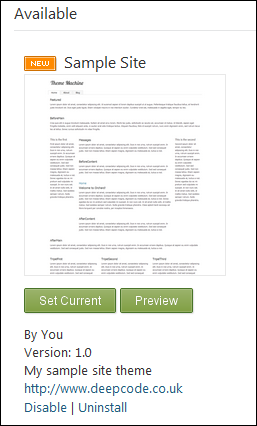
Open the orchard dashboard and navigate to “Themes”. What you should find now is you have a new theme available;

image

Click set current and navigate back to your site and voila, you should have your new theme in all it’s glory;

image

Fill it with some standard content
Go ahead and add some content to your site – add an about page (and add it to the menu), a blog (and a couple of posts) and use the HTML widget to add some content to the various zones on the homepage (there is a widget layer specifically for the homepage) – maybe add content as placeholders for the twitter feed we will add to the homepage and add a recent blog post widget to the central tri panel zone. You should then have something like this;

image

Next
In the next post, I’ll look at building the twitter widget for the homepage.

Tuesday, 10 May 2011

Real world Orchard CMS – introduction.

So, I’ve been a bit quiet here recently, mainly because I’ve been absolutely swamped with a re-architecture project for a pretty major client, but any free time I did have I’ve been using it to learn about Orchard CMS. As you, yes you, you’re the only person that reads my blog… as you may know, I’ve had my own CMS for a number of years (http://www.fluxcms.co.uk or http://flux.codeplex.com), but with pressure of work I’ve not had much time to update it or add new features and to be honest, now that Orchard has released v1.1, I really don’t see much point in taking flux forward – Orchard kicks it’s ass to the ground and stomps on it’s private bits.

What is Orchard – it’s and ASP.NET MVC content management system, backed by Microsoft and is Open Source!
If you haven’t heard of Orchard, I strongly encourage you to go look at it now – http://www.orchardproject.net or http://orchard.codeplex.com – it’s well designed and uses some great technology like ASP.NET MVC3, the new Razor view engine, NHibernate for persistence, AutoFac for DI/IOC and it’s got a nice, active and helpful community. The key people on the project are Microsoft employees and MS have kindly funded the project up to this point, and presumably will continue to do so in the future, but there is a reasonably vibrant, and growing, community around the product.

Learning Orchard
Anyway, I needed to build a site for a friend of mine who is shortly launching a set of premium SharePoint components and solutions and for this he needed a website to promote and sell his wares, I volunteered to help out as his requirement would touch on most areas of Orchard and gave me a good reason to dive in with a real world example that I could then reskin and make open source for the basis for this series.

Learning orchard was quite straight forward, the source is available and there is some good documentation on the site – the recent release of v1.1 was also a godsend (take a look at the new shape tracing features to see why). What I did find though was as I started to go beyond the basics of modules and skins, the documentation was a little light, but the community made up for this, with regular and prompt answers to questions and some good overall advice. (big up to bertrandleroy and randompete on the forums for all their patience and help!).

I hope that this series will help other newcomers to adopt this CMS and grow the community further.

Scope
And so, without further ado, the scope of the site is for a fictitious company that makes premium components, themes and modules for orchard. They require a site which features;

  • Nice(ish) site design
  • Homepage layout with
    • an aggregation of recent content, both from the site and from external sources (eg: Twitter)
    • a promotion area to have the most recent product promoted
  • Blog to post articles, tips and announcements for the products
  • Rudimentary general pages
  • A list of products they sell
  • Product sections – each product will feature;
    • Separate pages for main product overview, features etc.
    • Ability for users to rate products and enter reviews
    • Screenshot library for each product
  • Basic shopping functionality
    • On any of the product pages, add the product to the basket
    • Products may be pre-release and so instead offer a “register your interest” option.
    • Shopping cart view
    • Check out via swreg.com or similar.

All in all, this is a pretty simple site but touches on all the key areas of development with Orchard. The look and feel of the site is as per the following mock up (click for a larger view);

orchard-kitbag-screenshot

Up next
So that’s the stage set, up next we’ll get ourselves a copy of orchard and make a start on skinning it to look like the above. I’m not planning on covering how to use orchard to manage your site in any of these posts by the way, this will purely be technical content which I’m hoping to write in a recipe style so you can both follow along with the series or use each article as a reference for how to achieve a particular goal.

Thursday, 3 March 2011

How to annoy paying wi-fi access users.

I’m staying at the premier inn at tower hill in London this week and, on Sunday night I decided to whip my credit card out to the tune of £20 for a week’s internet access on their wifi, provided by spectrum interactive.

It goes like this;

1. I connect to wifi, then sign in;

image

That goes well and tells me I’m signed in – it also tries to open a session window that doesn’t exist;

image

All good right, well, you’d think so. I start actually using the service, send an email, browse facebook, twitter, read some articles and connect to source control and then;

2. Five to ten minutes later, the connection ceases working.

Only solution is to close the browser, open it up again and it gives me the login screen again;

image

3. Sign in again

So, I sign in again, but this time it tells me I’m already signed in and tells me to force a logout;

image

So I do as it asks, I click “HERE” to sign me out of the session that it’s closed and it gives me some rather strongly worded warnings and tells me my account is locked!

4. Get warned about sharing connections

image

5. Sign in again (two sign ins for the price of one)

After reading the warnings, promptly then ignoring them, I sign in again, and again get the connected message and missing session window;

image

6. GOTO (2)

Rinse and repeat every 5 to 10 minutes.

The moral of the story
Testing… it’s not a luxury, if you don’t do it or do it badly be prepared to piss off your customers!

Tuesday, 22 February 2011

Reading list redux

It’s been a while since I posted my recommended reading list, so here’s the 2011 version.

Product Details Code complete 2nd edition
Steve McConnel
Microsoft Press


A practical guide to the craft of programming.

Get it from Amazon.co.uk
Product Details Design patterns – elements of reusable object oriented software.
Gamma, Helm, Johnson and Vlissides
Addison Wesley

The famous gang of four book featuring 20 odd common design patterns.

Get it from Amazon.co.uk
Product Details Patterns of enterprise application architecture
Martin Fowler
Addison Wesley

This book details many software design patterns found in enterprise software by the thoughtworks guru, Martin fowler.

Get it from Amazon.co.uk
Product Details The mythical man month
Frederick P. Brooks
Addison Wesley

This is a collection of essays on software project management that was first published in 1975.It contains the now legendary “Brooks Law”, that adding manpower to a late project only makes it later. The concepts laid out in this book are as valid today as they were 30 years ago.

Get it from Amazon.co.uk
Product Details Peopleware
Tom Demarco and Timothy Lister
Dorset house publishing

This book makes the assertion that most development projects fail because of failures within the team – a humorous and riveting read.

Get it from Amazon.co.uk
Product Details Joel on software
Joel Spolsky
APRESS

I’ve just finished reading this, and the second series (more Joel on software) and it’s an insightful look at the craft of development, the people who do development and running a technology business. Highly recommended.

Get it from Amazon.co.uk
Product Details More Joel on software
Joel Spolsky
APRESS

As above, this book builds on the previous one – there’s some new stuff and some more depth on some of the topics and again I highly recommend reading it, but if you have a choice between this and the earlier book, choose the earlier one.

Get it from Amazon.co.uk
Product Details Founders at work
Jessiva Livingston
APRESS

A great read, stories of a number of high profile start ups that have gone on to great things. The book is insightful and for a geek like me who likes to understand tech history, its a staple.

Get it from Amazon.co.uk
Product Details Coders at work
Peter Seibel
APRESS

This follows a similar vein to the founders at work but is a series of interviews with some great programmers and engineers. Its good to get in the mind of some of these people, but at times the book can be a little dry.

Get it from Amazon.co.uk
Product Details Accidental Empires
Robert X. Cringely
Penguin books

A cracking look at the history of the technology industry – this book is extremely well written and I couldn’t put it down once I started.

Get it from Amazon.co.uk
Product Details Dreaming in code
Scott Rosenberg
Three Rivers Press

Software is hard – this book follows the work of Mitch Kapor’s Chandler project over the course of 3 years and poses the question – why is good software so hard to make?

Get it from Amazon.co.uk

Anyone any further suggestions?

SDLC – Key to a successful development project

In this week’s SDLC related post, I’m going to try to explain how to structure a successful development project, one that when it goes live with users, puts happy smiles on their faces and, because it addresses their needs, massages away the pains they have been having. I’m talking of course here about bespoke development projects (internal development projects) rather than a software house writing the next version of “Micropple iWordPad 2015 Enterprise Edition SP2” – there are subtle yet important differences between the two types of project including;

  • Software house
    • Low cost/revenue per user head
    • Focus on lower cost, high volume sales requires the product to be best in market
    • High degree of spit and polish – can spend significant money on UI design to ensure product looks “the nuts”
    • Ship dates fluid, dictated by feature completion.
  • Bespoke
    • Is best in market by definition as it addresses the businesses very specific needs.
    • Requires spit and polish, but focus is on cost, usability, functionality and implementation time.
      • A fine balance – lack of spit = user rejection, too much = missed functionality
    • Very high cost per user head.

Spit and polish
There’s one contentious issue there – it almost seems like I’m saying that internal or bespoke software won’t be as high quality as a software product from a vendor – that’s not what I mean – quality must still be high, but in terms of going the extra mile to have the most appealing, beautiful and slick UI, unfortunately it is a practical truth that internal development can’t afford to put the same amount of time and money into this as a software house. Internal projects are faced with a trade off between a high level of spit and polish versus factors such as cost and timescales.

Consider a business that is spending £1.4 million on a custom system to, lets say, manage insurance claims and the user base is 200 claim handlers – then the cost per seat of that software is £7,000. Now consider the same business buying something off the shelf for £250,000 that meets around 70% of their requirements – they now have a cost per seat of £1250. The business understands however that the 30% of missing requirements means it won’t deliver on their key objectives and, because their business is so unique (they archive their claim documentation in shredded format for security and file it with a warehouse on the moon), they need to go down the bespoke route – the off the shelf package won’t cut the mustard.

Now they are spending an extra £5750 per user so the product damn well better be good and meet the moon archiving objectives, so you can’t say internal software doesn’t need to have high quality – it absolutely, positively must, but when faced with the choice of tweaking individual pixels in form layouts versus building feature Z (which will save them another £100k per year) the business will choose feature Z every time.

That is the reason I say internal software doesn’t require the same level of spit and polish – it still needs to be slick, but whereas the software house needs to spend the money to polish their UI to make sales, the internal software will often concentrate on features – those features will still be polished, just not to the same extent.

Ok, so that was a long winded way of saying this post is more applicable to bespoke developments rather than the software house – both should follow the same core principle – listen to the customer, but the bespoke team has one advantage – the customer is sat next to them, in the same building, or at least in the same company.

Engaging the customer
Failure in projects is often down to a lack of engagement with the users – they can feel that the new system is forced upon them without consultation and, to be frank, the users of your shiny new system are the ones with the highest understanding of their domain and often have the best suggestions for improvement. As such, it’s important to engage with the users of your system in a variety of ways to let them have their say in how the system should function. So how do we do this at the various stages of the project?

The kick off meeting
At the start of the project, I usually try to get as many users as possible together in one place and present the project to them. This early presentation is a great time to outline the vision for the project, what we’re hoping to achieve and also to set some expectations with them that you want them to be involved at various times. Describing the system and how initially we think it will work and what problems it will address generates an excitement about the project and gets them thinking about how they want to see the project progress.

Of course, at this point you’ve already done some up front estimating to get the client to agree to spend a million pounds with you and the business will have set some goals for when the system needs to be available so you already have constraints at this point, but it should be trivial to accommodate user’s suggestions and ideas, although it has to be said not all of them – you will always find someone with a whacky idea that has no mileage and so as a leader on a project you’re going to need some diplomacy skills!

At the end of the kick off meeting, everyone should understand the objectives of the project and know they are going to be expected to contribute in coming weeks and months. This is their opportunity to change things for the better and to help build a system that will help them do their jobs productively. Allow time at the end for questions and let people voice their concerns and ideas, but guide them into contributing the bulk of their discussions into workshops.

Iterating and workshops
I’ve mentioned in earlier posts that the detailed functional design work should be done an iteration ahead of the actual construction but to get the detail for this design, I like to use workshop sessions with small groups of users. There’s nothing particularly special about these sessions, you get a maximum of around 6 users together in a room, a whiteboard and someone to record important details.

With everyone gathered, we explain the purpose of the workshop and it’s scope (you might have users that work across different functional areas who are keen to get their ideas across) and ask them to describe their job, the processes they follow, where improvements could be made, and what the new application should look like. Time-box the session to around an hour (people’s attention will start to wane beyond this) and ultimately you should end up with whiteboards full of process charts, low fidelity UI designs and some idea of what data you need to capture and how it relates – this, combined with the output from several workshops, should then feed into the design documentation.

image

An important thing to note here, a successful workshop starts with just the material I’ve mentioned above – I’ve seen misguided analysts conduct workshops where the starting point has been a visio diagram or presentation of how they think the user works and the processes they follow and then proceed to present this to them rather than asking them to collaborate in the design. The problem with this is, users switch off, they come to the conclusion you already know everything you need to know (or think you do, you fool!) and generally won’t engage in a productive design session – if anything they will tear your presentation to pieces because it’s being pitched to them as the way to work rather than asking them to contribute.

Requirements and documentation
From the workshops and all the useful information gleaned from the users, the analyst will then work with the architect to draw up the functional specifications. These are simple use cases written for the user that describe how the system should operate including;

  • Case properties
    • Who does it.
    • How the case is triggered.
    • What conditions dictate the use case is executed.
    • What the outcome should be.
  • Summary
    • A brief description of the purpose and flow of the use case.
  • Normal path
    • The path through the use case in bullet points
      • What the user does, what controls they interact with, the data that is captured.
      • The rules that are checked (conditional logic that can trigger an alternate path)
  • Alternate paths
    • The alternative paths through the use case raised from conditional logic in the normal path

This document should avoid technical implementation details or any specific technology and rather talk in the language of the user. These documents are then reviewed for accuracy by the users and a refinement cycle ensues until everyone agrees that the document describes how this piece of the system should work. These reviews can be done by simply sending out the document and gathering responses, but I find it productive to take the users from the workshops into a discussion where we quickly review and refine the document together (this often drives out any missed details that can be accommodated rapidly with agreement from the product owner and the users in the room).

Technical documentation
With the functional specification complete and agreed, the architect then takes over and transposes the functional details into a physical specification. I’m a firm believer that development is a creative vocation and so the developers should be left to be creative, but given enough information to be able to implement the application within a set of boundaries. As such, the technical specifications are usually done in the form of;

  • Data or domain object model (depending on your preference of data first or objects first)
  • Low fidelity interface mock ups
  • Implementation notes.

This should be all the developer needs to be able to implement the required functionality – the specifics are up to them provided they are following the boundaries of the overall application architecture and framework – for instance your architecture may prescribe NHibernate as an ORM layer, hydrating and persisting aggregate root domain objects through a repository pattern, surfaced in the UI through MVVM using Prism and so on.

Active development and the show and tell
As the construction iteration starts, the functional and technical documentation is provided to the developers, but this is done in a formal way too. The idea being, as the development manager/architect/technical lead, your job is to not only design the system and solve the complex technical issues, but you are the interface between the business and the technical team, you should speak both languages (and for this reason it’s my opinion that the best leads are socially and business aware programmers themselves and should remain active and hands on with code).

At the start of the iteration, my teams hold an iteration planning meeting. At this meeting all the developers involved in the product gather with the analyst, product owner and you as the leader – we go through in absolute detail all of the functional and technical specifications so that everyone has a deep understanding of the requirements and how we are going to implement it – this often involves re-iterating earlier workshops on whiteboards along with discussing the documentation. The programmers are expected to contribute in detail to the ideas of how the implementation should progress, but also in the process of refining the estimates which they should own and take responsibility for.

This can take the form of planning poker or some of the other fun approaches to planning, but my preference is simply to work with the programmers to split the use case down into 1-4 hour individual tasks and estimate them themselves. This planning session gives us a very detailed view of what is involved in the implementation and allows us to compare this to our original high level estimates, the resources and the velocity we have available for that iteration. Where there is slack, we can pad out with more polishing and where there is overrun we can start to look at cutting nice to have functionality from the scope to make the amount of work for the iteration fit to the velocity we have available.

I should note here that the initial iteration plan would be done from the high level estimates and this means you need a good estimator pulling those high level estimates together. If the estimator isn’t a programmer herself, there could be large differences between the high level and detailed plans and this is going to cause you significant problems. In my last project, over 18 iterations, my margin of error between high and low level estimates was around 2% – if this was say, 20% and was optimistic, you’ve just essentially lost one member of a 5 man team due to your bad estimating.

From the iteration planning meeting (I usually allocate one entire day for this), the entire dev team is up to speed with the requirements, has an idea of how to implement everything, understands what tasks need to be done over the iteration and can get cracking. At this point, it’s tempting to become insular and just get on with the development whilst your users get on with their day job, and that is a mistake – the users need to feel engaged continually and you need them to have sight of the emerging product because in doing so, the users are more likely to realise, very early, when things might be going askew.

This review doesn’t need to be formal, doesn’t need to be meetings and presentations, it’s useful to get a handful of users each week for 10-15 minutes crowded around one of the programmers computers to look at how the system is progressing. These show and tell sessions can be extremely valuable in detecting and fixing those small issues that always crop up in dev projects, and getting visibility of them early.

The final mechanism for engagement is the burn-down. People like to see progress, especially management and the people who’s necks are on the line for delivery on time and on budget. On a small team this can be very simple – the individual tasks identified during iteration planning can be put on post it notes and stuck to a whiteboard grid where rows represent the use case being developed (the stickies go in each row representing the use case they belong to) and the columns represent the state of the item – todo, in progress, for test, done (this is a typical scrum board).

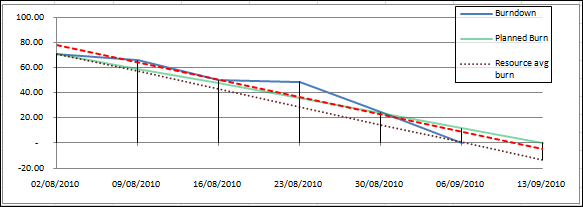
At any time, anyone can take a look at the board and see a good visual indication about where the team is up to during that iteration. Each week, or even daily, the team lead should transpose current amount of work remaining onto a line chart showing the progress over time, the goal line and a trend line which will be indicative of whether the team will complete all work by the end of the iteration.

image

For larger teams, especially those distributed, you need some way of tracking this in a centralised tool using TFS work items, FogBugz, VersionOne or a similar product which will allow the team to carry out work in the same way and automatically produce the burn down. In these circumstances it’s a good idea to have a project wall for those interested in progress – a large LCD on the wall rotating between different views on the iteration – burn down, work completed etc etc.

Ending the iteration
At the end of the iteration, the use cases should be complete, tested and essentially ready for delivery. At this point, the work can either be released through to acceptance testing or, for larger applications where it doesn’t add value to deliver small chunks, be demonstrated back to users. Testing is an interesting point – developers should be taking responsibility for their work and testing it to ensure all of the paths through the use case work as prescribed, a dedicated test team can augment this significantly and for larger developments it’s an absolute necessity. In this case, the output from the iteration should feed into the next testing iteration and defects should be fixed before it is released to user acceptance testing – the testing cycle (test, fix, test, uat, fat etc)  is a topic in itself and so I’ll leave it there for now.

Conclusion
In summary, engaging users and keeping them engaged is a critical aspect to the success of any development project, ignore users at your peril. I can testify that over numerous successful projects, keeping users engaged has been pivotal in successful delivery – the last thing you want to do is keep your project insular, deliver and then find that the finished product doesn’t match up to users expectations – that’s a sure fire way to ensure project failure.