Saturday, 3 October 2009

Flux.NET quick start package released

As promised, I've just wrapped up the content of my previous post, with some extras to produce a FLUX.NET quick start package. You can get it now on codeplex : http://flux.codeplex.com/Release/ProjectReleases.aspx?ReleaseId=26826#DownloadId=86138

To use it:

  1. Unzip the distribution into a folder on disk
  2. Create an application in IIS that maps to this folder (To work out of the box, the application should be hosted on localhost. If it isn’t, you will need to update the domain mappings in the website mapping tool in flux.)
  3. Create an SQL database called FluxStarterKit (You can actually call it whatever you like but you must change the connection strings in /settings/flux.config)
  4. Execute /documentation/flux.startup.sql against the SQL database

That’s it.

To view the website:

  1. Navigate to the IIS website you created above

To open the admin tool:

  1. Navigate to the IIS website you created above + /admin
  2. Login as admin@fluxcms.co.uk with a password of password

10 Step guide to getting a basic FLUX.NET CMS site up.

Today I decided to start a new site for a friend of mine, and being the owner of the FLUX.NET open source CMS, I obviously decided to use that. I figured I'd use this opportunity though to document a step by step guide to how to get flux.net setup from download to a single basic page being up and running, so here goes.

Step 1 - get the distro!

Go to http://flux.codeplex.com and get the latest release package (v2.0 release here)

Step 2 - Copy the files into your site

1. From the distribution, copy the /Src/flux_client folder into the folder that will be the root of your site

image

2. Next go into /Src/Deepcode.Flux.Admin/and copy the entire contents into a /admin directory in your site

image

3. Move the bin directory from admin, 1 level down, outside of the admin directory.

4. Finally, copy one of the web.config files from the distribution into your site. These are in the root of the distribution and are named FormsWeb.Config and WindowsWeb.Config. In this instance, I want to use forms authentication so I'll take FormsWeb.Config, copy it into my site and rename it to web.config.

5. At this point, you should have a site directory structure as follows;

image

Step 3 - configuring IIS and SQL for local development

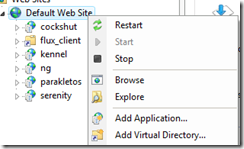
1. Open IIS manager, right click on the default website and select to create a new application (I'm using IIS7 in this exercise):
image

2. Give the virtual directory an alias to use, set it's application pool to classic .NET app pool and point the physical path to the directory you've created in step 2.4 above.

image

3. Open SQL Server and create a database for your content. (You can get the installer tool to create it for you, but I prefer to create it by hand)...

Step 4 - install the application

1. Navigate to http://localhost/youralias/admin/setup/install to start the installation process and click next to open the setup database form:

image

2. Enter the parameters necessary to connect to the database you created earlier. For my local development environment, I setup my server as ".", fluxtest as the database name, ticked the database has already been created checkbox,  and specified windows authentication as the SQL authentication mechanism. Click next to go to authentication setup.
 image

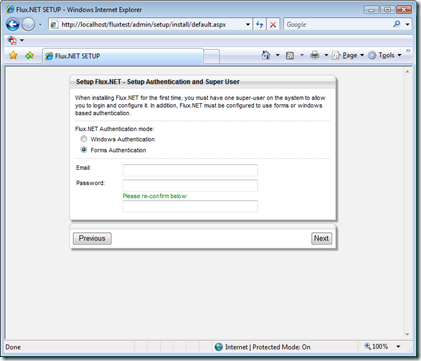
3. As we're aiming for forms authentication here, I selected "Forms authentication"  and setup the details of my super user to correspond to myself. Click next to go to general setup;

image

4. Enter a name for the installation (which will appear in the administration tools), along with a default mail server and an address which flux can send email as. Click next to review your installation settings.

image

5. Click finish to begin installation. At this point the system will install the database scripts and generate configuration files. As such, the app pool users of your web application must have write access to the location of your site and the SQL user/windows user also must have permission to create tables and stored procedures etc in your database. Once complete, you should see a screen like that below and a flux.config file will appear in a new folder called settings in your application.

image

6. If you "click here to continue" flux is now completely setup and you should be able to access the admin tool and it's modules etc as below;
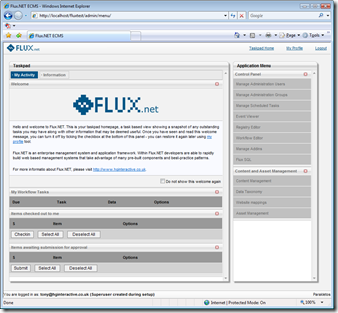
image

However, the application itself doesn't know anything about content at this point.... we need to configure it to make it do something next.

Step 5 - opening your site in visual studio.

In order to do anything useful we will need to open visual studio 2008 and open the web site. Open it directly from the local IIS installation. If it offers to update it to .NET 3.5, say yes so that we can utilise LINQ and other cool features in our rendering templates. With this done, you should now have an environment ready to roll;

image

Step 6 - the worlds most basic content type

Back in flux, If you open "content management" and select to add a new item of content, you will notice that it doesn't give you any options of what to add. That is because flux is completely agnostic of what data makes up content. It understands content concepts and how content should relate etc, but not necessarily what fields make up what types of content, for this we must give it some more information.

For the purposes of this demonstration we're going to build a CMS that can host multiple web sites, but only has basic HTML pages available to it. This keeps the scope simple so that I can actually complete this blog post in one sitting!!!!

1. In VS.NET Create a new folder under /settings called "types" and a folder within this called "Site".

2. Add a new XML file to this folder and name it "Site.type.config". Then paste the content below into it;

<NodeType ID="Site" Name="Website" LimitVersions="1">

    <AddForm>~/settings/types/Site/form.aspx</AddForm>
    <EditForm>~/settings/types/Site/form.aspx</EditForm>

    <Relationships AddRoot="true">
        <Add>Page</Add>
    </Relationships>

    <StaticData>
        <Template>~/settings/types/Site/render.aspx</Template>
    </StaticData>

</NodeType>

This defines a content type that we can add to our system. LimitVersions="1" tells flux only to keep a maximum of 1 version history of anything that is of this type. The Add/Edit form specifies the ASPX templates that will be used to add or edit content items of this type, which we'll build shortly. The relationships section determines how this content type relates to other items. In this case, we tell flux that sites can be added to the root node and within them, a content type called page can be added. Finally the static data template item specifies the rendering template when content of this type is rendered in html.

3. Now we need to create the ASPX file that will let us add and edit content in flux. Create a new web form called form.aspx in the /settings/types/Site directory and set it's content as follows;

<%@ Page Language="C#" Inherits="Deepcode.Flux.Core.UI.CMS.CMSContentForm" ValidateRequest="false"%>
<%@ Register TagPrefix="flux" Namespace="Deepcode.Flux.Core.UI.Controls" Assembly="Deepcode.Flux.Core"%>

<script runat="server">
    // Type ID being managed by this form
    protected override string FormTypeCode { get { return "Site"; } }

    // Do form setup
    protected override void SetupForm(int ContentID, int ParentID)
    {
        if (!Page.IsPostBack)
        {
            fChannelPath.NodeIDParent = ParentID;
            fChannelPath.NodeIDPathed = ContentID;
        }
    }

    // Save fields to content object
    protected override void SaveContent(ref Deepcode.Flux.Core.Systems.CMS.ContentObject save)
    {
        save.NodeName = this.fChannelPath.Text;
        save.NodeTitle = this.fChannelName.Text;
    }

    // Load fields from content object
    protected override void LoadContent(Deepcode.Flux.Core.Systems.CMS.ContentObject load)
    {
        this.fChannelName.Text = load.NodeTitle;
        this.fChannelPath.Text = load.NodeName;
    }
</script>

<html>
<head id="Head1" runat="server">
    <link href="../../../admin/Asset/Style/GeneralStyle.css" rel="Stylesheet" type="text/css" />
</head>
<body class="nopadshaded">
<form id="form1" runat="server">
<flux:HostTable ID="HostTable1" runat="server">

<%-- Summary --%>
<flux:ValidationSummarySection ID="ValidationSummarySection1" runat="server" HeaderText="Please correct the following errors"/>

<%-- Form area --%>
    <flux:Section ID="Section1" runat="server" Title="Add/Edit Website channel">
    <flux:ShadePadBox ID="ShadePadBox1" runat="server">

        <table cellspacing="0" cellpadding="3" border="0">
        <tr><td>Channel Name:</td>
            <td><asp:TextBox runat="server" ID="fChannelName" Width="300px" MaxLength="500"/></td>
            </tr>
        <tr><td>Channel Path:</td>
            <td><flux:NodePath runat="server" ID="fChannelPath" Width="200px" MaxLength="100"/></td>
            </tr>
        </table>

    </flux:ShadePadBox>
    </flux:Section>

<%-- Buttons --%>
<flux:Section ID="Section2" runat="server">
<flux:PadBox ID="PadBox1" CssClass="Pad5Button" runat="server">
    <asp:Button runat="server" ID="btnSave" Text="Save" OnClick="btnSave_Click" CssClass="button"/>&nbsp;&nbsp;&nbsp;
    <asp:Button runat="server" ID="btnCancel" Text="Cancel" OnClick="btnCancel_Click" CausesValidation="False"/>
</flux:PadBox>
</flux:Section>

<%-- Validators --%>
<asp:RequiredFieldValidator ID="RequiredFieldValidator1" Runat="server" ControlToValidate="fChannelName" 
    ErrorMessage="You must specify the title of this channel" Display="None"/>

<asp:RequiredFieldValidator ID="RequiredFieldValidator2" runat="server" ControlToValidate="fChannelPath"
    ErrorMessage="You must specify the path of this channel" Display="None"/>

</flux:HostTable>

</form>
</body>
</html>

There are a large number of flux specific controls in there, but it should be reasonably self explanatory. The base class CMSContentForm within flux provides everything necessary to wire our form up. It invokes Save/Load content methods and utilises the form type code to determine what it's editing. All we do is override these methods and add the fields in/out of the persistence mechanism.

4. We need to go ahead and create a Page content type now also, so we can publish something so add another folder within types called Page along with the configuration file "Page.type.config" and it's editor form "form.aspx", using the following content:

/Settings/types/page/Page.type.config

<NodeType ID="Page" Name="Web Page" LimitVersions="1">

    <AddForm>~/settings/types/Page/form.aspx</AddForm>
    <EditForm>~/settings/types/Page/form.aspx</EditForm>

    <Relationships AddRoot="false">
        <Add>Page</Add>
    </Relationships>

    <StaticData>
        <Template>~/settings/types/Page/render.aspx</Template>
    </StaticData>

</NodeType>

/Settings/types/page/Form.aspx

<%@ Page Language="C#" Inherits="Deepcode.Flux.Core.UI.CMS.CMSContentForm" ValidateRequest="false"%>
<%@ Register TagPrefix="flux" Namespace="Deepcode.Flux.Core.UI.Controls" Assembly="Deepcode.Flux.Core"%>

<script runat="server">
    // Type ID being managed by this form
    protected override string FormTypeCode { get { return "Page"; } }

    // Do form setup
    protected override void SetupForm(int ContentID, int ParentID)
    {
        if (!Page.IsPostBack)
        {
            fPath.NodeIDParent = ParentID;
            fPath.NodeIDPathed = ContentID;
        }
    }

    // Save fields to content object
    protected override void SaveContent(ref Deepcode.Flux.Core.Systems.CMS.ContentObject save)
    {
        save.NodeName = this.fPath.Text;
        save.NodeTitle = this.fPageTitle.Text;
        save.Fields["MenuTitle"] = this.fMenuTitle.Text;
        save.Fields["BodyContent"] = this.fHtml.Text;
    }

    // Load fields from content object
    protected override void LoadContent(Deepcode.Flux.Core.Systems.CMS.ContentObject load)
    {
        this.fPath.Text = load.NodeName;
        this.fPageTitle.Text = load.NodeTitle;
        this.fMenuTitle.Text = load.Fields["MenuTitle"];
        this.fHtml.Text = load.Fields["BodyContent"];
    }
</script>

<html>
<head id="Head1" runat="server">
    <link href="../../../admin/Asset/Style/GeneralStyle.css" rel="Stylesheet" type="text/css" />
</head>
<body class="nopadshaded">
<form id="form1" runat="server">
<flux:HostTable ID="HostTable1" runat="server">

<%-- Summary --%>
<flux:ValidationSummarySection ID="ValidationSummarySection1" runat="server" HeaderText="Please correct the following errors"/>

<%-- Form area --%>
    <flux:Section ID="Section1" runat="server" Title="Add/Edit Page">
    <flux:ShadePadBox ID="ShadePadBox1" runat="server">

        <table cellspacing="0" cellpadding="3" border="0">
        <tr><td>Path:</td>
            <td><flux:NodePath runat="server" ID="fPath" Width="200px" MaxLength="100"/></td>
            </tr>

        <tr><td>Page Title:</td>
            <td><asp:TextBox runat="server" ID="fPageTitle" Width="300px" MaxLength="500"/></td>
            </tr>
        
        <tr><td>Title for menus:</td>
            <td><asp:TextBox runat="server" ID="fMenuTitle" Width="300px" MaxLength="50"/></td>
            </tr>
        </table>

    </flux:ShadePadBox>
    </flux:Section>
    
    <flux:Section ID="Section2" runat="server" Title="Page Content">
        <asp:TextBox runat="server" ID="fHtml" Width="100%" Height="150px" />
    </flux:Section>

<%-- Buttons --%>
<flux:Section ID="Section3" runat="server">
<flux:PadBox ID="PadBox1" CssClass="Pad5Button" runat="server">
    <asp:Button runat="server" ID="btnSave" Text="Save" OnClick="btnSave_Click" CssClass="button"/>&nbsp;&nbsp;&nbsp;
    <asp:Button runat="server" ID="btnCancel" Text="Cancel" OnClick="btnCancel_Click" CausesValidation="False"/>
</flux:PadBox>
</flux:Section>

<%-- Validators --%>
<asp:RequiredFieldValidator ID="RequiredFieldValidator1" runat="server" ControlToValidate="fPath"
    ErrorMessage="You must specify the path for this page" Display="None"/>

<asp:RequiredFieldValidator ID="RequiredFieldValidator2" Runat="server" ControlToValidate="fPageTitle" 
    ErrorMessage="You must specify the title of this page" Display="None"/>


</flux:HostTable>

</form>
</body>
</html>

Step 7 - creating some content

image

1. Open the administration console (http://localhost/[youralias]/admin/) and select "Content Management" from the right hand menu.  You should be presented with an empty cms as follows;
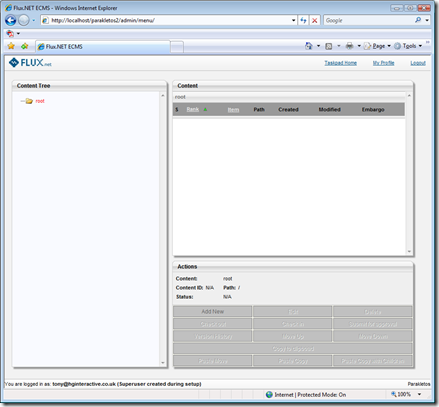
image

2. Click "Add new" in the actions panel and you will be presented with the new "website channel" form which we defined earlier. This is presented immediately without asking what sort of content you wish to create as it's the only type that can be added to the root like this.

3. Enter test for the channel name and path as below and click save.

image

4. Now click the "test" node in the tree view to the left and then click "Add new". This will present the form for adding a page, again as defined above. Define a home page as follows;

image

5. Repeat the process to create another new page called "About us".
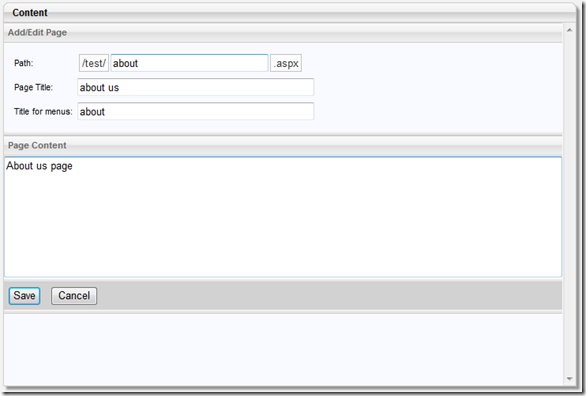
image

6. You should now have a site defined as follows;

image

7. And you will notice that all of your pages presently are shown with a green icon indicating they are checked out for editing by you.

image

8. In order for this content to appear on the site, it must be checked in, and optionally validated through the workflow processes. An easy way to check everything in quickly is to go back to the admin home page and select the items that are checked out to you and check them all in in one go. Alternatively, select each in turn and click check-in.

9. Once they are checked in they should present in blue;

image

Step 7a - using a WYSIWYG editor

A downside to what we've seen so far is our editor is free text. It doesn't allow us to write bold, italics, insert images etc. As such, we would normally obtain a WYSIWYG editor and embed that instead. In this instance, you could grab the latest version of FCKEditor, which is my favourite editor that works well across all browsers. Normally we'd download FCK editor's latest source and then apply flux specific changes to it, to allow the editor to use the standard flux asset and link browsers. Feel free to use this process, or to save time, you can download the basic starter kit which I am producing as a result of this article from our codeplex site. For those interested however, to use a WYSIWYG editor like this we would;

1. Download the latest FCKEditor and apply flux specific changes to it (replace the asset and link browser).

2. Extract it's contents to a folder in your site called /FCKEditor

3.  Copy the FredCK.FCKEditorV2.dll into your site's Bin directory.

4. Create a folder in settings called common and create a custom user control in there with the name fckEditor.ascx. The content of the ASCX should be as follows;

<%@ Control Language="C#" AutoEventWireup="true" %>
<%@ Register TagPrefix="fck" Namespace="FredCK.FCKeditorV2" Assembly="FredCK.FCKEditorV2" %>

<script runat="server">
    public string Value
    {
        get
        {
            return fContent.Value;
        }

        set
        {
            fContent.Value = value;
        }
    }
    
    protected void Page_Load(object sender, EventArgs e)
    {
        if (!Page.IsPostBack)
        {
            fContent.BasePath = "~/FCKEditor/";
            fContent.ToolbarSet = "Default";
        }
    }
</script>

<fck:FCKeditor runat="server" ID="fContent" Height="200px"/>

5. We then replace the textbox in form.aspx for the Page content type;

6. From here, the editor should allow us to display html etc.

image

Step 8 - setting up mappings and wiring it up

Flux is capable of doing URL re-writing for you, and is capable of being multi-homed against different domains etc as a result. In order to tell flux which folder to get it's content from for different domains and which page is the home page, we need to use the mapping tool.

image

1. Open website mappings and select to add a new mapping

2. The domain we're adding a mapping for during development here is localhost, so enter that into the domain field.

3. Select the "test" root node as the site's content root node - this determines which node contains all the content for this domain.

4. Select the "home" node as the site's home page node.

image

5. Click save. You have successfully setup the mapping between the domain and the content.
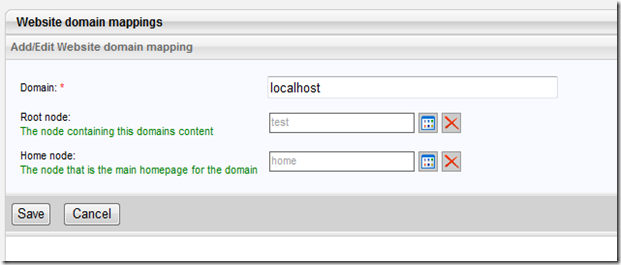
image

6. As flux doesn't force you to use the URL re-writer engine, we must now hook this up in code. Create a default.aspx web form in the root of your site and set it's content as follows; This simply redirects to the correct URI whenever someone accesses the site.

<%@ Page Language="C#" %>
<%@ Import Namespace="Deepcode.Flux.Core.Systems.URLRewriter"%>

<script runat="server">
protected void Page_Load()
{
    Rewriter rw = new Rewriter();
    rw.RewriteFromHome( Context );
}
</script>

Step 9 - Writing the rendering template for the worlds most basic content type

With the domain maps etc in place, we're ready now to show the content we've created to the world. If you navigate now to your site, you will get an error saying it can't find the render template for the page. That's because we still need to create it.

1. Create a new web form - /settings/types/page/render.aspx and set it's content as follows;

<%@ Page Language="C#"%>
<%@ Import Namespace="Deepcode.Flux.Core.Systems.CMS" %>
<%@ Import Namespace="System.Linq" %>
<script runat="server">
    protected ContentObject Content { get; private set; }

    protected override void OnLoad(EventArgs e)
    {
        Content = ContentQuery.GetByID(Int32.Parse(Request["nodeid"]));
        if (Content == null) Response.Redirect("~/", true);
    
        Page.Title = Content.NodeTitle; 
        html.Text = Content.Fields["BodyContent"];
        
        // Get the menu together by querying everything within my parent....
        ContentQuery query = new ContentQuery();
        query.BaseMatch.AND(new StaticFieldMatch(
            ContentStaticField.ParentID, 
            ContentQueryOperator.EQ, 
            Content.FK_ParentID));
    
        menu.DataSource = from c in query.GetMatching() 
                          select new 
                          { 
                              Url = Page.ResolveUrl(String.Format("~/{0}/{1}.aspx", 
                                      c.NodePath, c.NodeName)), 
                              Title = c.NodeTitle };
        menu.DataBind();
        
        
        base.OnLoad(e);
    }
</script>

<html>
<head runat="server"/>
<body>

    <div>
    <asp:Repeater ID="menu" runat="server">
        <ItemTemplate>
            <a href="<%#Eval("Url")%>">[<%#Eval("Title")%>]</a> &middot;
        </ItemTemplate>
    </asp:Repeater>
    </div>

    <asp:Literal ID="html" runat="server"/>

</body>
</html>

You should now be able to navigate to your site and view a basic page with a simple menu:

image

image

Step 10 - What next?

Well, that was the overview for how to get a basic CMS up and running. It's quite complex, but this means that flux isn't prescriptive about anything - if you don't want to use it to define the actual structure of your site, you don't have to, you can use it as a content repository, and ask it for content as necessary. In fact this approach works quite well when building complex sites. You can even setup flux to work with the excellent ASP.NET MVC framework. Simply have one site for the admin and another site (the MVC app) for the front end, which in turn uses the flux API's to get at it's data.

Whilst this was an overview, I am intent now on packaging this as a sample onto codeplex (http://flux.codeplex.com) so that it can be used as a starting point very quickly without repeating all the steps above.

Notes on live deployment

When installing your finished product onto your deployment site, chances are you are installing to a shared environment where IIS is already configured for you and the database is already created, but empty. In this case, all you need to do to deploy the first time is;

  • FTP all of your files up to the server
  • On the first instance, delete settings/flux.config so that the database scripts are executed
  • Login to http://[yoursite.com]/admin/setup/install/ to walk through the installation process
  • Create your content and domain mappings.....

From then on, if you change your template code etc, you just need to re-deploy your files.

Tuesday, 22 September 2009

Visual Studio 2008 crapping out when debugging?

Had a weird issue today where visual studio would blow up when I finished debugging a unit test. Turns out, the bug wasn’t anything to do with debugging or unit testing etc, but a bug in visual studio 2008 that may manifest if you changed your panel layouts. Each time I debugged the test, I was moving the immediate window from it’s default position to be docked with the other debug windows at the bottom of the screen and it was this that was causing the crash. There’s a hotfix available from the Microsoft bods:

http://code.msdn.microsoft.com/KB960075

Wednesday, 29 July 2009

NHibernate N:N relationships

NHibernate provides the facility to map out many-to-many relationships without the need for the intersection table to be represented in the object model. Take for example, the following schema of Users, Roles and the intersection table that links users to many roles and roles to many users;

image

We then have the following object model to represent this;

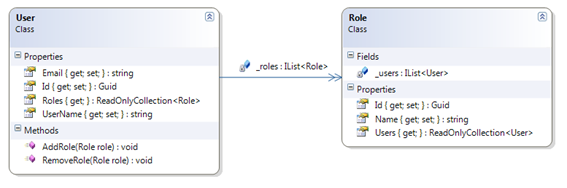
image

or, in code if you prefer;

public class User
{
    // Fields
    public virtual Guid Id { get; set; }
    public virtual string UserName { get; set; }
    public virtual string Email { get; set; }

    // Storage for the roles that this user belongs to
    private readonly IList<Role> _roles = new List<Role>();

    // Accessor to list of roles - note we don't return list
    // that we can add/remove from - we use methods to do that
    // so we can implement any business logic.
    public virtual ReadOnlyCollection<Role> Roles
    {
        get 
        { 
            return new ReadOnlyCollection<Role>(_roles);
        }
    }

    // Method to associate a role with this user
    public virtual void AddRole( Role role )
    {
        _roles.Add( role );
    }

    // Method to remove a role from this user
    public virtual void RemoveRole( Role role )
    {
        _roles.Remove(role);
    }
}
public class Role
{
    // Fields
    public virtual Guid Id { get; set; }
    public virtual string Name { get; set; }

    // Storage for the users that have this role
    private readonly IList<User> _users = new List<User>();

    // Returns list of users belonging to this role
    // Notice this can't be added or removed from.
    // Nor is there any logic to add users into roles
    // as the link is maintained from the User object.
    public virtual ReadOnlyCollection<User> Users
    {
        get
        {
            return new ReadOnlyCollection<User>(_users);
        }
    }
}

Notice that the relationship between users and roles is maintained and owned in the user object, not role. The role object just gives us information about which users belong to a role, but we can’t add or remove users into it without loading the user and accessing it’s Add/Remove Role methods. We can map this out as follows (notice, I’m using Fluent mappings for NHibernate here);

public class UserMap : ClassMap<User>
{
    public UserMap()
    {
        base.Id(x => x.Id).GeneratedBy.GuidComb();
        base.Map(x => x.UserName);
        base.Map(x => x.Email);

        HasManyToMany<Role>(Reveal.Property<User>("_roles"))
            .LazyLoad()
            .AsBag()
            .WithTableName("UserRoles")
            .WithParentKeyColumn("UserId")
            .WithChildKeyColumn("RoleId")
            .Access.AsReadOnlyPropertyThroughCamelCaseField(Prefix.Underscore)
            .Cascade.All();
    }
}

public class RoleMap : ClassMap<Role>
{
    public RoleMap()
    {
        base.Id(x => x.Id).GeneratedBy.GuidComb();
        base.Map(x => x.Name);

        HasManyToMany<User>(Reveal.Property<Role>("_users"))
            .LazyLoad()
            .AsBag().Inverse()
            .WithTableName("UserRoles")
            .WithParentKeyColumn("RoleId")
            .WithChildKeyColumn("UserId")
            .Cascade.None();
    }
}

Notice that the role map has .Inverse() set, which indicates that it is not the owner of the relationship.

That is pretty much all there is to it, NHibernate will take care of maintaining the relationship table for you.

Tuesday, 28 July 2009

Query NHibernate – Simple query patterns

There are a variety of ways to query NHibernate, including using HQL, the criteria API, Linq2NH, and the criteria API tied up with the Lambda extensions. My preference is the criteria API as it’s a powerful way of expressing dynamic queries. I’m going to explore how we go about implementing some of the more basic query patterns using this API;

Given the following database as an example, where a location can be split into multiple sub-locations, each sub-location belonging to a cost centre, we’ll drive out some simple queries;

 image

First off, a simple location query by name;

ICriteria c =
    session.CreateCriteria(typeof(Location))
    .Add(Restrictions.Eq("Name", "Manchester"));

Next, a query that will check the name contains particular text and the postcode starts with text provided.

ICriteria c =
    session.CreateCriteria(typeof(Location))
    .Add( Restrictions.Conjunction()
        .Add(Restrictions.Like("Name", "%manchester%"))
        .Add(Restrictions.Like("Postcode", "M60%")));

How about looking for all sub locations where it’s parent location has a postcode of M60*?

ICriteria c = session.CreateCriteria(typeof(SubLocation))
    .CreateAlias("Location", "l")
    .Add(Restrictions.Like("l.Postcode", "M60%"));

Going further, how about finding all sub locations where some text can be found either in the sub location name, the location name, location address, location postcode or cost centre name? Simples….

ICriteria criteria = session.CreateCriteria(typeof(SubLocation))
    .CreateAlias("Location", "l")
    .CreateAlias("CostCentre", "cc")
    .Add(Restrictions.Disjunction()
        .Add(Restrictions.Like("Name", freeTextToMatch))
        .Add(Restrictions.Like("l.Name", freeTextToMatch))
        .Add(Restrictions.Like("l.Address", freeTextToMatch))
        .Add(Restrictions.Like("l.Postcode", freeTextToMatch))
        .Add(Restrictions.Like("cc.Name", freeTextToMatch)));

What about finding all locations that have more than one sub location?

DetachedCriteria subquery = DetachedCriteria.For(typeof(SubLocation))
   .Add(Restrictions.EqProperty("l.Id", "Location.Id"))
    .SetProjection(Projections.Count("Id"));

ICriteria criteria = session.CreateCriteria(typeof(Location), "l")
    .Add(Subqueries.Lt(1, subquery));

It’s a bit more complicated, but the first bit creates a reusable query that will look for sub locations where the sub location’s parent location Id is of the same value as the Id property of the aliased object “l” passed into the query. It then projects the results into a count against the Id property.

The second part then creates a criteria that will find all locations, aliased as “l” (for the sub query above), and execute the given subquery, ensuring that the result is > 1.

Finally, getting a bit more complex, find all locations having more than one sub location in cost centre named “ENGINEERING”?

DetachedCriteria subquery = DetachedCriteria.For(typeof(SubLocation))
        .CreateAlias("CostCentre", "cc")
        .Add(Restrictions.EqProperty("l.Id", "Location.Id"))
        .Add(Restrictions.Eq("cc.Name", "ENGINEERING"))
        .SetProjection(Projections.Count("Id"));

ICriteria criteria = session.CreateCriteria(typeof(Location), "l")
        .Add(Subqueries.Lt(1, subquery));

Rhino – Mock versus Stub

Questions always pop up on when we should use mocks and when we should use stubs.

To summarise the differences;

  • Stubs
    • Provide canned answers to calls made during tests
    • Don’t respond to anything else
  • Mocks
    • Setup expectations - behaviour that will be verified as part of the test

Links to articles that discuss same:

Saturday, 9 May 2009

Why-o-why is this so difficult!

This is really getting my goat today – I’ve been looking around for a week now for some way of sucking out the content of my old blog (community server 2.1, self hosted) and spitting it out into my new host (blogger.com). I want to take across all of the content, including attachments, images, posting dates and tags etc, but there is nothing out there that seems to do a particularly adequate job!

Blogging has been around for a while now, and regardless of the type of host we use, blog articles are largely all the same – they have a title, some rich text, inline images, tags, attachments and a publishing date time. How hard can it be to come up with a canonical format to easily move this content into and out of different hosts and have all the hosts support that standard.

Hard is all I can assume as it’s not been done in the years that blogging has been around, with the exception of half hearted attempts at standardisation like with BlogML, which doesn’t deliver on the objectives I’ve mentioned.

Wednesday, 4 March 2009

Using Regular Expressions to identify HTML tags

In many situations we might find ourselves looking to find specific HTML tags within a fragment in order to process them in some way. A good example would be a HTML “white list” of tags that you want to pre-process to allow through anti cross site scripting encoding.

The following regular expression will find all tags specified (highlighted red) in the input, regardless of them being start tags, end tags, self terminating tags and irrespective of the number of attributes etc.

<[/]?(P|B|I)(/>|\s/>|\s[\S|\s]*?>|>)

This will also return correct results when looking for <I> tags in that it won’t incorrectly allow <IMG> to be a positive match.

Wednesday, 21 January 2009

NHibernate and schema creation/update

A colleague of mine today enlightened me about one of the features in NHibernate that lets you completely ignore the whole issue of managing and updating database schema. You can use NH mappings to define the entire schema and let NH worry about creating the database and updating between the different versions.

Back in the day I used to build data first, designing ERDs and sprocs before writing any code, and so I was a little worried about indexing, constraints, naming foreign keys and such like, but the schema is more than capable of articulating this too.

Tying this up with Fluent NHibernate, strongly typed mapping files / auto map and you have a very powerful, quick to implement platform for domain driven data access.

Here's an article that tells you all about it better than I can;

http://blogs.hibernatingrhinos.com/nhibernate/archive/2008/04/28/create-and-update-database-schema.aspx

Saturday, 20 December 2008

Building a Silverlight RSS reader - part 2 - getting the data.

Continuing from part 1, we're now going to extend our Silverlight application to get data (available feeds and actual RSS postings) which we will shortly bind to in the UI.

One of the things we need to work around is the cross domain security in Silverlight. It doesn't allow you to send any requests to services/sites outside of the domain in which the Silverlight xap is hosted without explicit permission from the service/site you're trying to call. This permission is granted by placing a cross domain policy file on the target server, but in our case we can't guarantee that our target RSS feed servers will have one in place.

Silverlight has this restriction for a very good reason - it would be very easy to create a distributed denial of service attack using Silverlight if it was able to call any web resource directly. Imagine making a nice Silverlight app that is used by hundreds of people and putting a payload in there that cripples a target web site.

To work around this we can send a request for data back to a web service in the ASP.NET application that is hosting the Silverlight application. This is then free to send a request to the target server for the data we're looking for (thereby circumventing any DDoS attack possibility as now all requests are coming from the server).

Defining the feeds.
Before we look at that though, we'll start with the simpler task of getting a list of available feeds. For this, create a feeds.xml file within your web solution (in the root) with content similar to the following. (feel free to replace with your own feeds).

   1: <?xml version="1.0" encoding="utf-8" ?>
   2: <feeds>
   3:   
   4:   <feed id="ScottGuthrie">
   5:     <title>Scott Guthrie</title>
   6:     <url>http://weblogs.asp.net/scottgu/rss.aspx</url>
   7:   </feed>
   8:  
   9:   <feed id="Deepcode">
  10:     <title>Deepcode.co.uk</title>
  11:     <url>http://www.deepcode.co.uk/rss.aspx</url>
  12:   </feed>
  13:  
  14:   <feed id="AyendeRaihen">
  15:     <title>Ayende Raihen</title>
  16:     <url>http://feeds.feedburner.com/AyendeRahien?format=xml</url>
  17:   </feed>
  18:  
  19: </feeds>

Now that we have a list of feeds, we need to get this up to Silverlight and populate the drop down list of available feeds. We could use a web request to simply load the XML, but as we're going to be building a WCF service anyway to marshal requests out to feeds, we might as well piggy back on those contracts and have one cohesive service.

Defining the service, operation and data contracts.
Now, under normal circumstances I'd advocate the use of several namespaces to separate and re-use the contracts etc. I'd have separate assemblies for the data contracts (RSSReader.Services.Contracts) another to define the "specification" of the services, or in other words, the operation contracts (RSSReader.Services.Spec) and another for the service itself. (RSSReader.Services). As you can't re-use assemblies in Silverlight though, this seems a little pointless for this particular exercise so we're just going to go with a single assembly - RSSReader.Services.

Let's go ahead and create this "class library" now. Right click the solution and select Add new project and select C# class library. Delete the automatically generated class1.cs file.

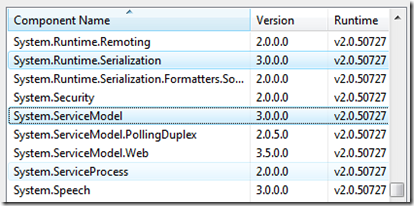
Add references to System.Runtime.Serialization and System.ServiceModel. These references allow WCF constructs to be used within your application;

image

image And finally, create 3 directories within the new project - Contracts, Repositories and Spec. In contracts we will define the classes that will be used to represent the data being sent between Silverlight and our service, in Spec we'll define the operational contracts - the methods we can call on our service and in repositories we'll add the data access code to get data from sources.

 

We now want to define what data we're going to expect to receive from Silverlight and what data we're going to send back to it. We're going to have two operations on our service - a method to get a list of all available RSS feeds, and a method to get the postings within a selected feed.

For the method to get a list of feeds, we won't have any data passed in, but we want to pass back out a list of feeds. We'll wrap the list of feeds into a response object in case we need to add anything new later. As such we'll have the following classes for querying what feeds we can select;

image

Notice the use of the DTO suffix. This stands for Data Transfer Object and is standard terminology when talking about what data will be exchanged between services. See the enterprise stack posting for more information about this.

When we request feed articles, we need to tell the service which feed we want to get articles for, and have it return the articles in a list, again wrapped in a response object should we need to expand it later. This gives us these classes;

image

These contracts are all just plain old CLR objects (POCOs), onto which we add WCF specific attributes to tell the service that the class is a data contract and what members should be serialised and sent over the wire. We do this using the DataContract and DataMember attribute. The code for GetFeedRequestDTO is shown below;

   1: using System.Runtime.Serialization;
   2: using System.Collections.Generic;
   3:  
   4: namespace RSSReader.Services.Contracts
   5: {
   6:     [DataContract]
   7:     public class GetAvailableFeedsResponseDTO
   8:     {
   9:         private readonly IList<RSSFeedDTO> _feeds 
  10:             = new List<RSSFeedDTO>();
  11:  
  12:         [DataMember]
  13:         public IList<RSSFeedDTO> Feeds
  14:         {
  15:             get 
  16:             {
  17:                 return _feeds;
  18:             }
  19:         }
  20:     }
  21: }

As you can see, we've marked the class as being a data contract and the Feeds property as being a data member.

The entire listing for the various contracts is shown below;

   1: /***** GetAvailableFeedsResponseDTO.cs *****/
   2: using System.Runtime.Serialization;
   3: using System.Collections.Generic;
   4:  
   5: namespace RSSReader.Services.Contracts
   6: {
   7:     [DataContract]
   8:     public class GetAvailableFeedsResponseDTO
   9:     {
  10:         private readonly IList<RSSFeedDTO> _feeds = new List<RSSFeedDTO>();
  11:  
  12:         [DataMember]
  13:         public IList<RSSFeedDTO> Feeds
  14:         {
  15:             get 
  16:             {
  17:                 return _feeds;
  18:             }
  19:         }
  20:     }
  21: }
  22:  
  23: /***** RSSFeedDTO.cs *****/
  24: using System.Runtime.Serialization;
  25:  
  26: namespace RSSReader.Services.Contracts
  27: {
  28:     [DataContract]
  29:     public class RSSFeedDTO
  30:     {
  31:         [DataMember]
  32:         public string Id { get; set; }
  33:  
  34:         [DataMember]
  35:         public string Title { get; set; }
  36:  
  37:         [DataMember]
  38:         public string FeedUrl { get; set; }
  39:     }
  40: }
  41:  
  42: /***** GetFeedRequestDTO.cs *****/
  43: using System.Runtime.Serialization;
  44:  
  45: namespace RSSReader.Services.Contracts
  46: {
  47:     [DataContract]
  48:     public class GetFeedRequestDTO
  49:     {
  50:         [DataMember]
  51:         public string FeedId { get; set; }
  52:     }
  53: }
  54:  
  55: /***** GetFeedResponseDTO.cs *****/
  56: using System.Runtime.Serialization;
  57: using System.Collections.Generic;
  58:  
  59: namespace RSSReader.Services.Contracts
  60: {
  61:     [DataContract]
  62:     public class GetFeedResponseDTO
  63:     {
  64:         private readonly IList<FeedArticleDTO> _articles 
  65:             = new List<FeedArticleDTO>();
  66:  
  67:         [DataMember]
  68:         public IList<FeedArticleDTO> Articles
  69:         {
  70:             get 
  71:             {
  72:                 return _articles;
  73:             }
  74:         }
  75:     }
  76: }
  77:  
  78: /***** FeedArticleDTO.cs *****/
  79: using System;
  80: using System.Runtime.Serialization;
  81:  
  82: namespace RSSReader.Services.Contracts
  83: {
  84:     [DataContract]
  85:     public class FeedArticleDTO
  86:     {
  87:         [DataMember]
  88:         public string Title { get; set; }
  89:  
  90:         [DataMember]
  91:         public DateTime Published { get; set; }
  92:  
  93:         [DataMember]
  94:         public string BodyContent { get; set; }
  95:     }
  96: }
  97:  

With our data contracts defined, we can now look at defining the operation contracts - the services themselves. As mentioned above, we're going to have a single service, lets call it RSSProxyService, and it will have two methods. A method to get all of the feeds that are available and a method to get the articles for a selected feed. The signatures of these methods will use the data contracts defined above. Within the Spec folder, create a new class file and name it IRSSProxyService.cs. The code should be as follows;

   1: using System.ServiceModel;
   2: using RSSReader.Services.Contracts;
   3:  
   4: namespace RSSReader.Services.Spec
   5: {
   6:     [ServiceContract]
   7:     public interface IRSSProxyService
   8:     {
   9:         [OperationContract]
  10:         GetAvailableFeedsResponseDTO GetAvailableFeeds();
  11:  
  12:         [OperationContract]
  13:         GetFeedResponseDTO GetFeed(GetFeedRequestDTO request);
  14:     }
  15: }

In WCF we define services as interfaces and then tell the service definition which concrete class to use that implements this interface. As you can see our two methods are marked up with [OperationContract] attributes, indicating that these are methods that will be exposed through the service and the interface itself is defined with a [ServiceContract] attribute.

We now need to provide a concrete implementation of the service. As such, create a new class called RSSProxyService.cs within the root of RSSReader.Services project;

   1: using System;
   2: using RSSReader.Services.Spec;
   3: using RSSReader.Services.Contracts;
   4:  
   5: namespace RSSReader.Services
   6: {
   7:     public class RSSProxyService : IRSSProxyService
   8:     {
   9:         public GetAvailableFeedsResponseDTO GetAvailableFeeds()
  10:         {
  11:             throw new NotImplementedException();
  12:         }
  13:  
  14:         public GetFeedResponseDTO GetFeed(GetFeedRequestDTO request)
  15:         {
  16:             throw new NotImplementedException();
  17:         }
  18:     }
  19: }

If you build now, things should build, but as we've not hooked anything up yet, it won't do a great deal. Lets make it actually do something and write some unit tests to check our implementation actually works.

Implementing the repository
Before we can get into the guts of the service itself, we need to think about how we're going to get data out of feeds.xml and from the RSS feeds themselves. I've chosen to implement a repository class so that my service concentrates on logic and uses the repository to handle any data persistence/access.

Before we dive headlong into writing a repository class though, we need to give some thought to testing. We want to be able to unit test this service to verify that it is working as anticipated, but we want to test the logic, not test if the internet is up and running (which is what we would be doing if we consumed an RSS feed directly - pass/fail would be dependent upon the RSS feed being available).

As such, we are going to want to replace the repository code when testing with a pre-canned or mocked version of it. This will allow us to control what data is sent to the service when we invoke it. To do this we must define an interface for the repository.

Within the repositories folder, create a new file - IFeedRepository.cs with the following content;

   1: using System.Collections.Generic;
   2: using RSSReader.Services.Contracts;
   3:  
   4: namespace RSSReader.Services.Repositories
   5: {
   6:     public interface IFeedRepository
   7:     {
   8:         IEnumerable<RSSFeedDTO> GetFeedDefinitionList();
   9:         RSSFeedDTO GetFeedDefinitionById(string id);
  10:         IEnumerable<FeedArticleDTO> GetArticlesForFeedId(string id);
  11:     }
  12: }

In this instance, our feed repository will offer 3 methods. One to get the feed definition list, one to get a specific feed definition record from the list and one to get all of the articles for a specified feed id.

We can then implement this by creating FeedRepository.cs, as follows;

   1: using System;
   2: using System.Collections.Generic;
   3: using System.IO;
   4: using System.Linq;
   5: using System.Net;
   6: using System.Xml.Linq;
   7: using RSSReader.Services.Contracts;
   8:  
   9: namespace RSSReader.Services.Repositories
  10: {
  11:     public class FeedRepository : IFeedRepository
  12:     {
  13:         private static XDocument GetFeedDefinitionData()
  14:         {
  15:             string filename = Path.GetFullPath(
  16:                 AppDomain.CurrentDomain.BaseDirectory) + "\\feeds.xml";
  17:             XDocument doc = XDocument.Load(filename);
  18:             return doc;
  19:         }
  20:  
  21:         /// <summary>
  22:         /// Loads the feed definition list from the XML file "feeds.xml"
  23:         /// </summary>
  24:         /// <returns></returns>
  25:         public IEnumerable<RSSFeedDTO> GetFeedDefinitionList()
  26:         {
  27:             XDocument doc = GetFeedDefinitionData();
  28:             
  29:             IEnumerable<RSSFeedDTO> list =
  30:                 from item in doc.Descendants("feed")
  31:                 select new RSSFeedDTO
  32:                 {
  33:                     Id = (string)item.Attribute("id"),
  34:                     Title = (string)item.Element("title"),
  35:                     FeedUrl = (string)item.Element("url")
  36:                 };
  37:  
  38:             return list;
  39:         }
  40:  
  41:         /// <summary>
  42:         /// Gets one feed definition item from feeds.xml
  43:         /// </summary>
  44:         /// <param name="id"></param>
  45:         /// <returns></returns>
  46:         public RSSFeedDTO GetFeedDefinitionById(string id)
  47:         {
  48:             XDocument doc = GetFeedDefinitionData();
  49:  
  50:             // query it for feed items and create RSSFeedDTO objects
  51:             var matchedFeeds =
  52:                 from item in doc.Descendants("feed")
  53:                 where ((string)item.Attribute("id")) == id
  54:                 select new RSSFeedDTO
  55:                 {
  56:                     Id = (string)item.Attribute("id"),
  57:                     Title = (string)item.Element("title"),
  58:                     FeedUrl = (string)item.Element("url")
  59:                 };
  60:  
  61:             if (matchedFeeds.Count() < 1) return null;
  62:  
  63:             return matchedFeeds.First();
  64:         }
  65:  
  66:         /// <summary>
  67:         /// Gets all of the articles available from the RSS feed
  68:         /// definition id specified.
  69:         /// </summary>
  70:         /// <param name="id"></param>
  71:         /// <returns></returns>
  72:         public IEnumerable<FeedArticleDTO> GetArticlesForFeedId(string id)
  73:         {
  74:             // Find the feed
  75:             RSSFeedDTO feed = GetFeedDefinitionById(id);
  76:             if (feed == null) throw new ArgumentException(
  77:                     String.Format("Feed id {0} not found", id));
  78:  
  79:             // Get the RSS payload
  80:             WebClient client = new WebClient();
  81:             string responsePayload = client.DownloadString(feed.FeedUrl);
  82:  
  83:             // Load it into LINQ to XML and find all items, 
  84:             // translate to FeedArticleDTOs
  85:             XDocument rssResponse = XDocument.Parse(responsePayload);
  86:             
  87:             IEnumerable<FeedArticleDTO> list =
  88:                 from item in rssResponse.Descendants("item")
  89:                 select new FeedArticleDTO
  90:                 {
  91:                     Title = item.Element("title").Value,
  92:                     Published = DateTime.Parse(item.Element("pubDate").Value),
  93:                     BodyContent = item.Element("description").Value
  94:                 };
  95:  
  96:             return list;
  97:         }
  98:     }
  99: }

As you can see, we're using LINQ to XML to query the XML data from feeds.xml and transform the data into our DTO classes, and when we retrieve data from the physical RSS feeds we're going to use the WebClient object, and again query and extract this with LINQ.

Implementing the service
With our repository in place we can now build our service implementation. Go back to our RSSProxyService.cs and change it's code to match this;

   1: using RSSReader.Services.Spec;
   2: using RSSReader.Services.Contracts;
   3: using RSSReader.Services.Repositories;
   4:  
   5:  
   6: namespace RSSReader.Services
   7: {
   8:     public class RSSProxyService : IRSSProxyService
   9:     {
  10:         // The feed repository we will use
  11:         private readonly IFeedRepository _feedRepository;
  12:  
  13:         public RSSProxyService()
  14:         {
  15:             _feedRepository = new FeedRepository();
  16:         }
  17:  
  18:         public RSSProxyService(IFeedRepository feedRepository)
  19:         {
  20:             _feedRepository = feedRepository;
  21:         }
  22:  
  23:         /// <summary>
  24:         /// Interrogates the feeds.xml file to return a list of 
  25:         /// available RSS feeds that can be displayed
  26:         /// </summary>
  27:         /// <returns></returns>
  28:         public GetAvailableFeedsResponseDTO GetAvailableFeeds()
  29:         {
  30:             GetAvailableFeedsResponseDTO feeds 
  31:                 = new GetAvailableFeedsResponseDTO();
  32:  
  33:             foreach (RSSFeedDTO feed in 
  34:                 _feedRepository.GetFeedDefinitionList())
  35:             {
  36:                 feeds.Feeds.Add(feed);
  37:             }
  38:  
  39:             return feeds;
  40:         }
  41:  
  42:         /// <summary>
  43:         /// Gets articles from the requested RSS feed.
  44:         /// </summary>
  45:         /// <param name="request"></param>
  46:         /// <returns></returns>
  47:         public GetFeedResponseDTO GetFeed(GetFeedRequestDTO request)
  48:         {
  49:             GetFeedResponseDTO response = new GetFeedResponseDTO();
  50:             foreach (FeedArticleDTO article in 
  51:                 _feedRepository.GetArticlesForFeedId(request.FeedId))
  52:             {
  53:                 response.Articles.Add(article);
  54:             }
  55:  
  56:             return response;
  57:         }
  58:     }
  59: }

If you notice our constructors now, we either create or accept an IFeedRepository object depending on which constructor is used - this allows us to write (or mock) a replacement repository, specifically for testing this service. (This is an example of coding for testability as when not thinking about unit testing, you wouldn't write code like this).

Our implementation of the service itself is now complete. We have to now either expose this via our web interface and write all the front end code to consume it in order to test it, or we need to write unit tests to satisfy ourselves that things are working as they should. I'd sooner find problems as early as possible, so lets write some unit tests.

Writing unit tests to check the service
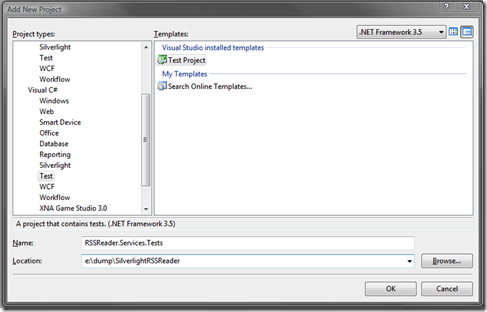
Add a new project to your solution, a test project and call it RSSReader.Services.Tests.

image

You can then clear out the AuhtoringTests.txt file, and rename the UnitTest1.cs file to RSSProxyServiceTests.cs. Also copy the feeds.xml file into your test project. You will need to tell the test project to deploy the feeds.xml file when it runs the tests, as follows;

Select the Test menu and choose "Edit Test run configurations" and then "Local test run". From the resultant dialog, select the deployment page and select "Add File" - choose feeds.xml from the RSSReader.Services.Tests directory and click Apply to save the changes.

image

In order to provide our service with a canned set of data from the repository, we're going to "mock" the repository using a mocking framework.

We're going to use the excellent Rhino Mocks mocking framework by Oren Eini (aka Ayende Rahien). You'll need to download this from here, extract it, and then add a reference in your test project to Rhino.Mocks.dll. Also add a reference to the RSSReader.Services project.

Finally change the RSSPRoxyServiceTests.cs to match the following;

   1: using System;
   2: using System.Collections.Generic;
   3: using Rhino.Mocks;
   4: using Microsoft.VisualStudio.TestTools.UnitTesting;
   5: using RSSReader.Services.Repositories;
   6: using RSSReader.Services.Spec;
   7: using RSSReader.Services.Contracts;
   8:  
   9: namespace RSSReader.Services.Tests
  10: {
  11:     [TestClass]
  12:     public class RSSProxyServiceTests
  13:     {
  14:         /// <summary>
  15:         /// This test validates that the feeds.xml file can be loaded
  16:         /// correctly and that it contains 3 defined feeds.
  17:         /// </summary>
  18:         [TestMethod]
  19:         public void ValidateFeedsLoaded()
  20:         {
  21:             IRSSProxyService service = new RSSProxyService();
  22:             GetAvailableFeedsResponseDTO response = 
  23:                 service.GetAvailableFeeds();
  24:  
  25:             Assert.IsNotNull(response);
  26:             Assert.AreEqual(3, response.Feeds.Count);
  27:         }
  28:  
  29:         /// <summary>
  30:         /// This test uses a mocked IFeedRepository to returned canned
  31:         /// data into the RSS proxy service implementation to allow it's 
  32:         /// logic to be tested. It ensures the correct number of articles
  33:         /// are returned when a feed is queried by ID.
  34:         /// </summary>
  35:         [TestMethod]
  36:         public void ValidateArticleCounts()
  37:         {
  38:             MockRepository mocks = new MockRepository();
  39:  
  40:             // Define the data we want the IFeedRepository to return
  41:             IEnumerable<FeedArticleDTO> feedList = new List<FeedArticleDTO>
  42:             {
  43:                 new FeedArticleDTO{Title="Article 1", 
  44:                     Published=DateTime.Now, BodyContent=""},
  45:  
  46:                 new FeedArticleDTO{Title="Article 2", 
  47:                     Published=DateTime.Now, BodyContent=""},
  48:  
  49:                 new FeedArticleDTO{Title="Article 3", 
  50:                     Published=DateTime.Now, BodyContent=""},
  51:  
  52:                 new FeedArticleDTO{Title="Article 4", 
  53:                     Published=DateTime.Now, BodyContent=""},
  54:  
  55:                 new FeedArticleDTO{Title="Article 5", 
  56:                     Published=DateTime.Now, BodyContent=""}
  57:             };
  58:  
  59:             // Mock the feed repository and setup some expectations
  60:             IFeedRepository feedRepository = 
  61:                 mocks.StrictMock<IFeedRepository>();
  62:  
  63:             using (mocks.Record())
  64:             {
  65:                 Expect.Call(feedRepository.GetArticlesForFeedId("MOCK"))
  66:                     .Return(feedList);
  67:             }
  68:  
  69:             GetFeedResponseDTO response;
  70:             using (mocks.Playback())
  71:             {
  72:                 // Test the service - the service will use the mock repository
  73:                 IRSSProxyService service = 
  74:                     new RSSProxyService(feedRepository);
  75:  
  76:                 // Request the MOCK feed
  77:                 GetFeedRequestDTO request = new GetFeedRequestDTO();
  78:                 request.FeedId = "MOCK";
  79:  
  80:                 // Get the response and test
  81:                 response = service.GetFeed(request);
  82:             }
  83:  
  84:             Assert.IsNotNull(response);
  85:             Assert.AreEqual(5, response.Articles.Count);
  86:         }
  87:     }
  88: }

This test class contains two specific tests that will test the workings of the service itself - ValidateFeedsLoaded will test that the service can load the feeds.xml file and correctly assemble the XML into the objects we're expecting.

ValidateArticleCounts is a little different in that it's using mocks. We define what data the repository is going to return when invoked, create a mocked object of the repository and then setup some expectations on what we expect the service code to do with our mocked repository.

In this case, we tell the mocking framework that we expect the service to call the repositories GetArticlesForFeedId method with a parameter of "MOCK", and when it does, the mock framework should return the canned data we've setup.

We then invoke the service, passing in the mocked repository so that it is used instead of the default and then we invoke the service with the parameters expected. If all goes well, the expected calls will be invoked and we will have a response from the service with the correct number of articles.

Now, for those eagle eyed among you, you will notice we're not testing the functionality of the repository. We certainly should, but as this series of posts is supposed to be about Silverlight, I'll leave that as an exercise for the reader - but we would have to encapsulate the WebClient so that it, itself, could be mocked so the repository is tested, not the availability of the RSS feeds...

If you now build your application and run it you'll find we have nothing more than we did at the end of the last article!! However we do have a completed service implementation and we can use test view to run the two unit tests and validate that our service is functional.

image

image

(NOTE: When you run your unit tests, you may get a "Test run deployment issue" saying "Rhino.Mocks.dll" is not trusted. This is because you downloaded the files from the Internet. The solution is to find the DLL's on your machine using explorer, right click each DLL and click "Unblock" - then do a rebuild and you should be good to go)

That's all for this instalment (it was longer than I expected!) - in part 3 we'll look at exposing the above service through the web project, consuming it in Silverlight and having fun with data binding.

Again, have a good Christmas!

Get the source code here.