Wednesday, 29 September 2010

Attach and Detach VHD files from the command line

Very simple and quick way to attach or detach a VHD file on demand, from the command line – use diskpart;

A) Create a diskpart script to attach your VHD;

Enter the following into a new text document (for the sake of argument, let’s call this attach-script.txt)

select vdisk file="your.vhd"
attach vdisk

B) Create a batch file to execute the diskpart script;

Invoke diskpart with the /s parameter as follows in your batch file (again, let’s call this attach.bat)

diskpart /s attach-script.txt

C) Create a diskpart script to detach your VHD;

Should be as follows (calling this detach-script.txt)

select vdisk file=”your.vhd”
attach vdisk

Create a batch file to execute the diskpart script;

As before, call diskpart with /s (detach.bat)

diskpart /s detach-script.txt

And your done…. just execute attach or detach as needed to mount/unmount your vhd file….

Getting a free lunch? Bitbucket is now free.

I’ve always been told there’s no such thing as a free lunch, but an email I received this morning appears to contradict this mantra!

I switched to Mercurial for my own personal/project source control earlier this year, abandoning subversion after many a happy year. When I made the switch, rather than host mercurial myself and have to worry about back-ups and the like, I signed up for a 10 repository plan with bitbucket, which was a meagre £10 a month. I had to do some creative merging of repositories to get all my projects into 10, but I was more than happy with the platform.

This morning however, I received a free lunch - an email that my plan was now free. They’ve teamed up with Atlassian and are now offering unlimited private and public repositories with 5 users for free!! I’ve not been able to find a catch :)

More info here: http://www.bitbucket.org

Thursday, 2 September 2010

MVC2 validation samples

I’ve posted a project on codeplex here: http://validationsampler.codeplex.com to demonstrate using standard out of the box MVC2 validation with jQuery for both server and client side, including posting through a normal http form with full page post and through ajax – loading the form into the page with ajax and submitting it using jQuery, with full integration to the validation framework. This is to support my recent posts on the topic;

Friday, 27 August 2010

Custom MVC 2 validation using jQuery – implementing client side validation in addition to server side

When I was looking for information on wiring up custom validation in MVC 2 I couldn’t find a lot of information on getting the client side stuff working with jQuery that a) didn’t involve manually changing the MicrosoftMvcJQueryValidation.js file or b) worked, so I set about working it out myself. Here is what I found – a walk through for getting server and client side validation working using jQuery.

See my earlier post on getting validation working with AJAX loaded forms too.

Ok, so first, go off and read this guide from Phil Haack, this is the groundwork you need to get validation working, which I’ll briefly re-iterate here before talking about getting custom jQuery validator wired up.

Stage 1 – getting validation working on the server side first.

1A: your custom validation attribute

The following is a basic skeleton for a validator that will check a string’s minimum length (yes I know we have validators for min and max length, I’m trying to be concise here and show how to roll your own!);

[AttributeUsage(AttributeTargets.Property)]
public sealed class MinimumLengthAttribute : ValidationAttribute
{
    public int MinimumLength{ get; private set; }

    /// <remarks/>
    public MinimumLengthAttribute( int minimumLength )
    {
        MinimumLength = minimumLength;
    }

    /// <remarks/>
    public override bool IsValid(object value)
    {
        if( value == null ) return false;

        string text = (string) value;
        if( text.Length < MinimumLength ) return false;

        return true;
    }
}
1B: Consume your validation attribute in your view model

Mark up your target model property with your validation attribute.

public class AddUserViewModel
{
    [MinimumLength(6, ErrorMessage="Password must be specified and be at least 6 characters long")]
    public string PasswordOne{ get; set; }
}
1C: Output some validation messages

Use the MVC ValidationMessageFor helpers to output some validation messages.

<%=Html.LabelFor( m => m.PasswordOne) %>
<%=Html.EditorFor( m => m.PasswordOne )%>
<%=Html.ValidationMessageFor( m => m.PasswordOne) %>
1D: Check the model state in your controller

When your model is posted into your controller action, it will be automatically validated. You can check the model state and act accordingly, something like;

if (!ModelState.IsValid)
{
    return View(userModel);
}

That’s it for server side stuff, if you fire up your form, leave the field blank and then submit it, the error message will appear. For the client side stuff we need to go a little further;

Stage 2 – get client validation working on the client

2A: Include validation base scripts

Include the following in your page to include the jQuery validation stuff. You may be asking, “where is MicrosoftMvcJQueryValidation.js, I don’t seem to have it” – it’s presently part of the MvcFutures project – take a look on codeplex.

<script type="text/javascript" src="/Scripts/jquery.validate.min.js"></script>
<script type="text/javascript" src="/Scripts/MicrosoftMvcJQueryValidation.js"></script>

2B: Tell your form to output client validation information
<%Html.EnableClientValidation();%>

This must be called BEFORE your Html.BeginForm – it tells the view context to output validation information in a script when the form is disposed. This doesn’t actually DO any validation, it just outputs the appropriate javascript data to tell your chosen engine what rules need to be implemented. The validation is actually wired up by a piece of javascript wired into the document.ready event from the MicrosoftMvcJQueryValidation.js file – again, if you’re loading your form using AJAX, your validation won’t get wired up, you need to take extra steps….

2C: Wiring up some client side code to the custom validation attribute

We now need to write some code that outputs the appropriate javascript data (at the end of the form) for our custom client validator, once we write it.

public class MinimumLengthValidator : DataAnnotationsModelValidator<MinimumLengthAttribute>
{
    private readonly int _mininumlength;
    private readonly string _message;

    public MinimumLengthValidator( ModelMetadata metadata, ControllerContext context, MinimumLengthAttribute attribute ) : base(metadata, context, attribute)
    {
        _mininumlength = attribute.MinimumLength;
        _message = attribute.ErrorMessage;
    }

    public override IEnumerable<ModelClientValidationRule> GetClientValidationRules()
    {
        var rule = new ModelClientValidationRule
        {
            ErrorMessage = _message,
            ValidationType = "tj-custom"
        };
        
        rule.ValidationParameters.Add("minparam", _mininumlength);

        return new[] { rule };
    }
}

Notice we don’t add the code to the validator attribute. That’s because the validator attributes aren’t MVC specific, you can use those in other technologies too, so adding MVC specific guff to those attributes would have been quite a pollution – instead the wrapper above takes an instance of the MinimumLengthAttribute we’ve defined in it’s constructor and then sets local members that we want to use on the client. The GetClientValidationRules() override then specifies what will be output in the javascript validation rules on the client – the basic stuff is the ErrorMessage which we pass through from the validator and the ValidationType which tells the validation stuff on the client what type of validation to execute (in this case it’s our custom validator which we need to setup called tj-custom). ValidationParameters is then used to build up any parameters we want to pass into our validator.

2D: Telling MVC that the above validator is the client side adaptor for our minimum length attribute;

We now need to tell MVC that when it comes across our validator (our MinimumLengthAttribute) it should use the MinimumLengthValidator class to generate the javascript rules for the client. We do this during Application_Start with the following code;

DataAnnotationsModelValidatorProvider.RegisterAdapter(typeof(MinimumLengthAttribute), typeof(MinimumLengthValidator));
2E: Registering our new client validation function

The final step is to actually write our new jQuery validator and register it with jQuery. (Now I think about it, I guess all the above steps apply to any client side validation technology you want to use and only this last step would be different!).

Remember in the ModelClientValidationRule we’re returning from our validator adapter above, we specified a validation type of “tj-custom”. We register a handler for this as follows;

jQuery.validator.addMethod("tj-custom", function (value, element, params)
{
    if (value == null) return false;
    if (value.length < params.minparam) return false;
    return true;
});

Notice the params structure is a mirror of the params we returned in the ValidationParameter from the adapter? All we do is check the value against the params and return true if validation is passed or false if it’s failed. Simple as that – no need to start messing around with the jQuery in the MicrosoftMvcJQueryValidation file, basically, if the mvc built in stuff doesn’t recognise the validation type it passes it through to __MVC_ApplyValidator_Unknown method which just passes data through to our code using the pattern above.

Disclaimer :)

I’ve unpicked this from the code I’m working on so I may have missed something minor, comment me if you have any questions. Enjoy……

Wednesday, 25 August 2010

MVC OOTB Validation when pulling in forms using AJAX and jQuery

I’m working on an MVC2 application that makes extensive use of forms being sucked into the current page using ajax like this, which issues the request and gets back html representing the form which is then presented in a jQuery UI modal dialog;

$.ajax({
        type: postType,
        url: url,
        data: data,
        dataType: "html",
        async: true,
        cache: false,
        success: function (data, text)
        {
            unlockPage();
            dialogContent(title, data, width);
        },
        error: function (request, textStatus, errorThrown)
        {
            unlockPage();
            handleStandardErrors(null, request);
        }
    });

I wanted to use the new out of the box validation toolset with data annotations, which on the face of it looks pretty cool, so I followed the guide on getting this working using jQuery validator. Namely, I got myself the MicrosoftMvcJQueryValidation.js from the MvcFutures project and then added data annotations to my view model, eg;

[Required(ErrorMessage="User email address is required")]
public string Email{ get; set; }

That’s it to get server side validation working, which works a treat, but to get client side working, I then added the following script includes to my master page;

<script type="text/javascript" src="/Scripts/jquery.validate.min.js"></script>
<script type="text/javascript" src="/Scripts/MicrosoftMvcJQueryValidation.js"></script>

Enabled client validation in my form and added some validation messages;

<%Html.EnableClientValidation();%>

<%using( Html.BeginForm("AddUser", "Users", FormMethod.Post, null)){ %>


<%=Html.LabelFor( m => m.Email) %>
<%=Html.EditorFor( m => m.Email )%>
<%=Html.ValidationMessageFor( m => m.Email) %>

Ran the app, and…..nothing… nada, not a thing. So I started digging and tracing through the MVC source. All appeared to be working as it should. EnableClientValidation was setting a flag in the form context to tell the framework to output validation code. The dispose method of MvcForm (which is instantiated with the BeginForm using) was invoking the code to output some javascript structured describing what to validate and how, but it didn’t seem to be using this anywhere. I soon worked out why…

This little snippet of code is in MicrosoftMvcJQueryValidation.js, which remember we included in our master page (which is rendered in the host page, NOT our partial form view we’re getting using ajax).

$(document).ready(function() {
    var allFormOptions = window.mvcClientValidationMetadata;
    if (allFormOptions) {
        while (allFormOptions.length > 0) {
            var thisFormOptions = allFormOptions.pop();
            __MVC_EnableClientValidation(thisFormOptions);
        }
    }
});

That won’t be fired so to get the validation working, we just need to do the same thing right? Not quite. I added the above code to a jQuery startup function in my partial view, it gets called successfully but….nothing, it still didn’t work because window.mvcClientValidationMetadata was undefined. Now the reason is something different – the jQuery startup function is actually invoked before the inline <script></script> block that sets window.mvcClientValidationMetadata!

The way the window.mvcClientValidationMetadata is used can help us though – the inline script pushes the latest validation data for the form onto this variable and the code above pops it back off. As such, we can just interrogate the length of the array when we start up and if there is no data there yet, retry after a short delay. If we keep doing that until it’s been processed all should be well with the world. So, my modified startup script is as follows;

$(function ()
    {
        initContentLoaded();

        setupMvcValidation();
    });

    function setupMvcValidation()
    {
        alert(window.mvcClientValidationMetadata);
        if (window.mvcClientValidationMetadata == undefined || window.mvcClientValidationMetadata.length < 1)
            setTimeout(setupMvcValidation, 100);

        var allFormOptions = window.mvcClientValidationMetadata;
        if (allFormOptions)
        {
            while (allFormOptions.length > 0)
            {
                var thisFormOptions = allFormOptions.pop();
                __MVC_EnableClientValidation(thisFormOptions);
            }
        }
    }

and all is indeed well with the world. I think this should even cover the edge cases where you have multiple forms in your partial view, each with their own validation, but I’ve yet to test it any more thoroughly.

Thursday, 15 July 2010

Undoing early morning/late night stupidity with Mercurial

So laaaate this morning (around 3am) I was putting some finishing touches to a refactor I was working on for my own project and I came to use tortoiseHg to look at the status of my files. Loads were selected for modification, many for addition and several that I’d removed were ready for removal.

Unfortunately for me with all these changes selected in TortoiseHG’s file status dialog I managed to hit the “Forget” button on the toolbar. Immediately my additions went back to unknown status and all my modifications were marked as removals (which I would assume is a revert not actually a remove!).

Anyway, completely NOT what I was looking for, so now I needed to work out how to get my files added back into the repository and how to make sure my modifications would be taken into account. You can’t just click on the modification that is now a removal in Tortoise and select add again – it doesn’t allow it, not sure why, so it’s time to go back to the command line.

First off, dealing with the adds that have now been forgotten is simple, we can just re-run a hg add and they will get pulled back in.

hg add

Dealing with the modifies which are now removals is more difficult. You can use hg add to add each individual file in one by one, but this is a massive pain in the ass, so instead use come clever old skool dos;

for /f %f in ('hg stat -rn') do hg add %f

the /f says we’re looking to process a file list, each file being pushed into %f. The command to execute is in the brackets and quotes (-rn lists only things tagged for removal and skips outputing the initial status character). The do command then specifies what to do for each one of the files returned… in this case, hg add it. And voila, problem solved and I can go to bed with my repository still in order….

Friday, 9 July 2010

Nugget of the week.... sleep at a given time;

Got a long running task that you want to let finish, but need to remember to sleep your machine?

at [time] "rundll32 powerprof.dll,SetSuspendState"

image

Should do the trick.

Uptime

I've got a small, cheap, linux server that I use purely to host my SVN repository. Just noticed something;

image

SWEET!

Wednesday, 30 June 2010

This is ridiculous!

image

Ever heard of atomic operations? If one bit fails, the entire thing should fail – don’t take my money and then not book my tickets!!! If you MAY have taken my money then you’d better damn well get in touch with ME, especially as it’s 10:01pm and your line’s are closed. Ridiculous!!!

Tuesday, 29 June 2010

Overriding the style of a jQuery UI datepicker

Recently, in my spare time, I’ve been working on a simple booking system for a friend of mine. I had the need to present a date selector using jQuery UI’s date picker, but I wanted to change the default behaviour as follows;

  • Dates in the past can’t be selected and must be stylised
  • Dates in the future can be selected, but the calendar should highlight any dates that are not available
  • I don’t want to go hunting and changing my jQuery UI theme styles, nor do I want to modify any jQuery UI code

The starting point – vanilla datepicker

Adding the following code;

$("#startDate").datepicker({
    numberOfMonths: 3,
    showButtonPanel: true,
    dateFormat: 'dd MM yy',
});

Provided the following default behaviour;

image

Disabling dates in the past and dates that have bookings already

So this part is pretty simple, the component provides us with two hooks of note – onChangeMonthYear which is fired when the user navigates the calendar between months or years etc (but not on first display) and the second – beforeShowDay, which is called before an actual day is rendered into the control and allows you to specify whether the date is available, any extra css to apply and a tooltip to show.

I could use the onChangeMonthYear event to load my known events via a JSON call and then check the variables in the beforeShowDay event, but to be honest I’m going to only be interested in future bookings and there aren’t going to be a massive volume. As such, I can afford to load all the events using a single ajax call during page start up and then interrogate the result in beforeShowDay.

So, my code to implement the datepicker now looks like this;

$("#startDate").datepicker({
        numberOfMonths : 3,
        showButtonPanel : true,
        dateFormat : 'dd MM yy',
        beforeShowDay : calendarDayShow
    });

with the following function;

  1. function calendarDayShow(targetDate)
  2. {
  3.     var availableResult = [true, '', ''];
  4.     var bookedResult = [false, '', ''];
  5.  
  6.     var now = new Date();
  7.     if (targetDate < now) return bookedResult;
  8.  
  9.     var targetYear = targetDate.getFullYear();
  10.     var targetMonth = targetDate.getMonth();
  11.     var targetDay = targetDate.getDate();
  12.     if (typeof (availability[targetYear]) == "undefined") return availableResult;
  13.     if (typeof (availability[targetYear][targetMonth]) == "undefined") return availableResult;
  14.     if (typeof (availability[targetYear][targetMonth][targetDay]) == "undefined") return availableResult;
  15.     return bookedResult;
  16. }

The component expects this function to return an array in the format of [<<availability>>, <<css>>, <<tooltip>>]. It’s worth noting that my availability data is stored as a JSON object in this hierarchy; (If there is an entry, that date is booked).

  • YYYY
    • MM
    • MM
      • DD = true
      • DD = true
  • eg: 2010
    • 6
      • 15 = true
      • 16 = true

So, on the above code, lines 3+4 are defining the available and booked responses. Line 6-7 checks if the date being rendered is in the past, and if it is, it returns a booked result to prevent it from being selected. This now results in the following;

image

Notice that 1st Aug and 12 July are booked in this example.

Making it look how I want it.

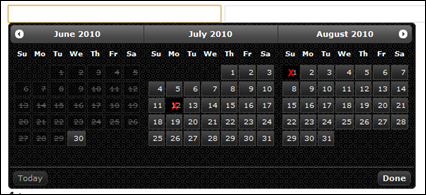
This is all well and good, but I want past dates to appear as disabled and booked dates to appear with a red X through them, like this end result:

image

I’m pretty sure you already know the answer – the beforeShowDay event expects us to pass back availability, and extra CSS classes to apply plus any tooltip we want. So we change our function thus;

function calendarDayShow(targetDate)
{
    var availableResult = [true, '', ''];
    var bookedResult = [false, 'bookedDayCalendar', 'Booked'];

    var now = new Date();
    if (targetDate < now) return [false, 'pastDayCalendar', 'Can\'t make bookings in the past!'];

    var targetYear = targetDate.getFullYear();
    var targetMonth = targetDate.getMonth();
    var targetDay = targetDate.getDate();
    if (typeof (availability[targetYear]) == "undefined") return availableResult;
    if (typeof (availability[targetYear][targetMonth]) == "undefined") return availableResult;
    if (typeof (availability[targetYear][targetMonth][targetDay]) == "undefined") return availableResult;
    return bookedResult;
}

So we’re now returning the extra CSS. We define this extra CSS is our site’s stylesheet;

/* Overides for jquery UI */
.bookedDayCalendar { opacity: 1; }
.bookedDayCalendar span
{
    background-color: Black;
    background-position: center center;
    background-repeat: no-repeat;
    background-image: url(booked.png);
    color: #aaa;
    border: none;
}
.pastDayCalendar { opactiy: 0.85; }
.pastDayCalendar span
{
    background-color: Black;
    background-image: none;
    text-decoration: line-through;
}

And voila, we get….

image

hmmm – not quite the desired result! The problem here is many of the styles are inherited from jquery UI, our reset.css and so on, and some of those styles are taking precedence over our new styles. As we are confident we want these attributes on this particular class, we can ensure they are applied with preference by adding the !important moniker to them in CSS;

.bookedDayCalendar { opacity: 1 !important; }
.bookedDayCalendar span
{
    background-color: Black !important;
    background-position: center center !important;
    background-repeat: no-repeat !important;
    background-image: url(booked.png) !important;
    color: #aaa !important;
    border: none !important;
}
.pastDayCalendar { opactiy: 0.85 !important; }
.pastDayCalendar span
{
    background-color: Black !important;
    background-image: none !important;
    text-decoration: line-through !important;
}

And we get the desired result.

image

Addendum;

Of course, you’ll want to use filter:Alpha(Opacity=…. for internet explorer;

.bookedDayCalendar { opacity: 1 !important; filter:Alpha(Opacity=100) !important; }
.bookedDayCalendar span
{
    background-color: Black !important;
    background-position: center center !important;
    background-repeat: no-repeat !important;
    background-image: url(booked.png) !important;
    color: #aaa !important;
    border: none !important;
}
.pastDayCalendar { opactiy: 0.85 !important; filter:Alpha(Opacity=85) !important; }
.pastDayCalendar span
{
    background-color: Black !important;
    background-image: none !important;
    text-decoration: line-through !important;
}